Custom torque controller
To run your own control law instead of a built-in controller (ADRC, PID), build it as a plugin and load it. The steps are below.
1. Create the scaffold
plem init my_controller
This creates one scaffold package in ./my_. If you leave out the name, plem init asks for it. If the PLEM environment is not set up, it stops and tells you what to do.
| Option | Changes | Default |
|---|---|---|
--class | The class name | Derived from the package name (my_ → MyController) |
--dir | The workspace location | ./<package name>_ |
The scaffold contains:
- A
compute()that outputs zero torque. ManipulatorDynamics, a helper that computes gravity and Coriolis terms.ToolLoad, a helper that subtracts the tool's weight from F/T readings.- An authoring guide (
CONTROLLER_) and aPLUGIN_ GUIDE. md README..md
2. Write the control law
Put your algorithm in compute() in the generated source.
- Read measurements from
measured, for examplemeasured.andposition(j) measured..velocity(j) - Read targets from
target, for exampletarget..position(j) - Write joint torques to
output_.torque
The full rules are in the authoring guide generated with the scaffold.
This code produces joint torques directly, inside the real-time loop at the configured control period (200–1000 µs, that is 1–5 kHz). Inside that loop, do not use:
- dynamic allocation
- file I/O
- locks
- waits
- exceptions
Source that overrides calculate_ from the old SDK no longer compiles; it fails with overriding final function. Move the body into compute() and replace the arguments with accessors.
| Old argument | New accessor |
|---|---|
joint_ | measured. |
joint_ | measured. |
target_ | target. |
dof | measured. |
Section 2.1 of the generated guide (CONTROLLER_) has the details, including code that delegated to the parent's calculate_. A .so you already built keeps working until you rebuild it.
The PD example in the authoring guide shows how to use the helpers. Its gains are not tuned, its stiffness is high, and it has no friction compensation, so it cannot be used for real work as is.
Before you use your own controller in normal operation:
- Design and tune it for your robot.
- Start unloaded and slow, with a torque limit.
- Verify it step by step.
Reading the tool F/T sensor (optional)
If the robot has an F/T sensor, read force and torque in compute() with measured.. The zero set on the Teaching Pendant is already subtracted. It is empty when there is no sensor or the value is invalid for that cycle; control without the force term then. A full example, detecting a zero change, and subtracting the tool's weight (ToolLoad) are on the F/T sensor page.
3. Build
When the scaffold is created, plem init prints where the workspace README. is. The build commands are in that file.
4. Register the workspace
Run plem from the directory you built in, and it asks whether to use this workspace. Accept, and it is layered on top as an overlay from the next launch. plem workspace shows what is registered and plem workspace clear removes it.
5. Select it in the robot profile
Registering does not activate the plugin. Select it in the robot profile:
- In
plemsettings (,), pick the robot and presse. - Change Controller to Plugin (advanced). A Plugin field appears below it.
- From the list (
Choose a built .so…), pick the built.so. The list shows plugins found in the registered workspace. With no registered workspace, it looks in the build output of a PLEM source checkout instead. - If your
.sois not listed, pickOther — enter absolute path…at the bottom and type the absolute path in the field that appears. When no plugin is found, this entry is already selected. - Press Save (
ctrl+s).
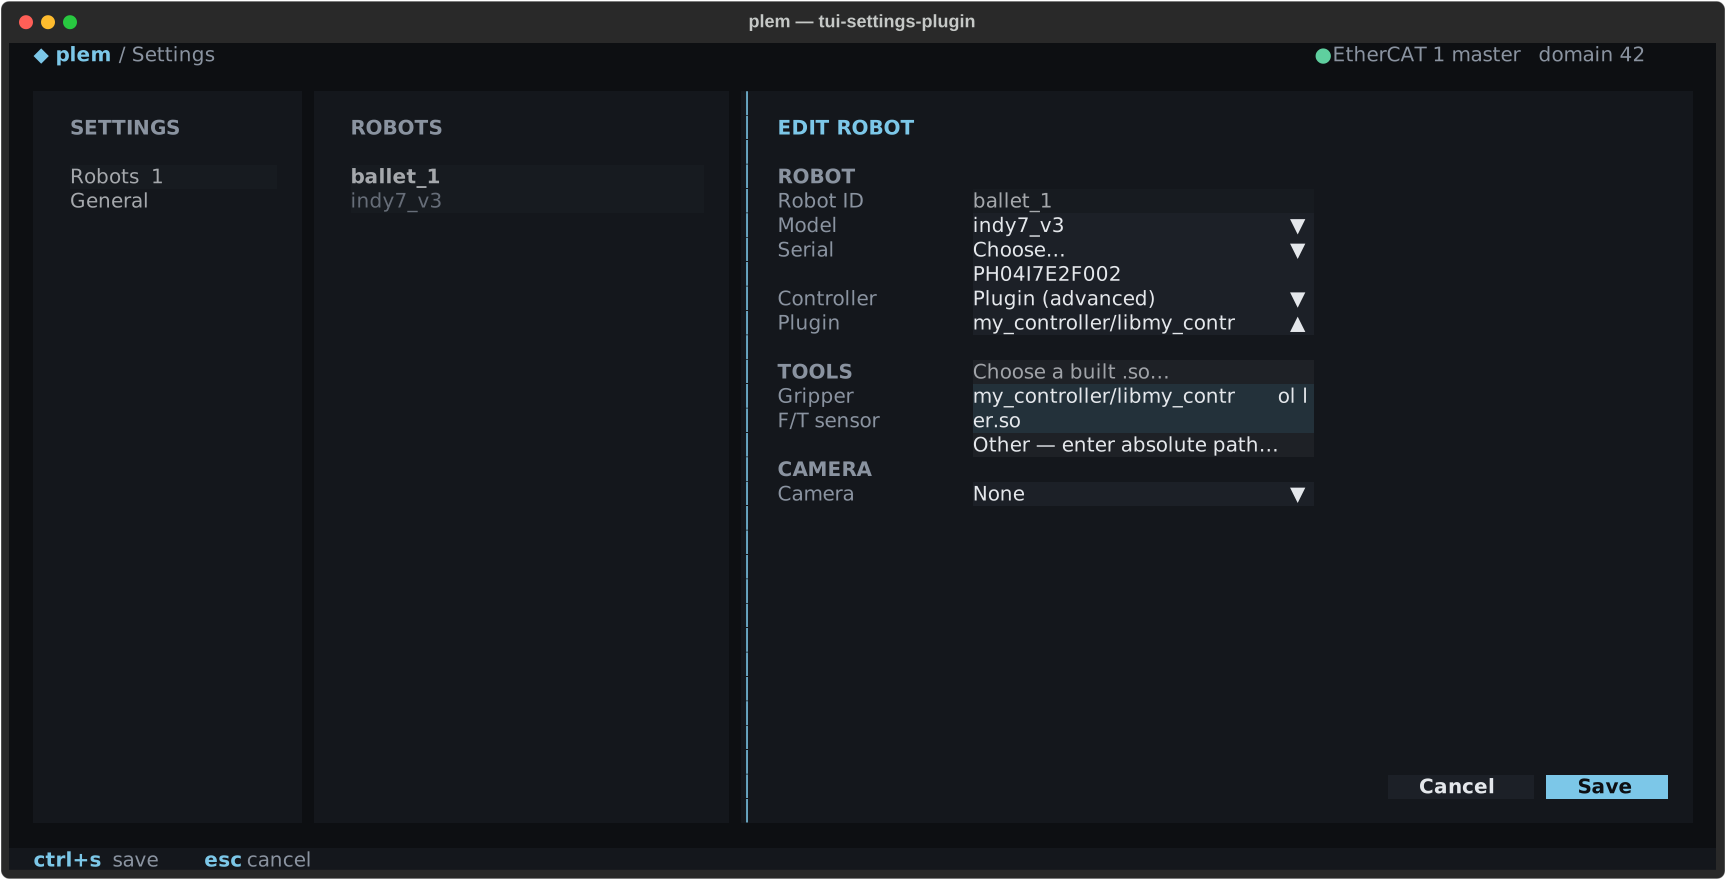
Leave the other profile fields as they are.
6. Restart
The profile takes effect from the next launch. Stop the stack and start it again. To check which controller came up, look at the Controller line (Plugin <file name>) in the TUI's SYSTEM pane.
7. Tune and observe in Lab
Parameters you declare appear in the Tuning tab, and signals you declare appear in the signal tree. The usual mode and safety conditions for tuning still apply (What each mode allows). Plugin controllers have no build-based tuning lock.