Building a program
A program is nodes and arrows on the canvas. Each node is one step, and each arrow runs from one of the node's results (outcomes) to the next node. The picture is the run order.
Every program begins at a single Start node. It cannot be deleted, and there is only one.
Build a basic program
Taking a pick-and-place program as the example, the steps are these.
1. New program
In Programs on the left, press the New program icon and type a name. An empty program opens with only the start node on the canvas.
If the open program cannot be saved first, nothing new is created: the name you typed stays and the reason shows. Press Esc to close the input.
2. Save poses as Waypoints
Save the home, approach and place poses in Moving the robot.
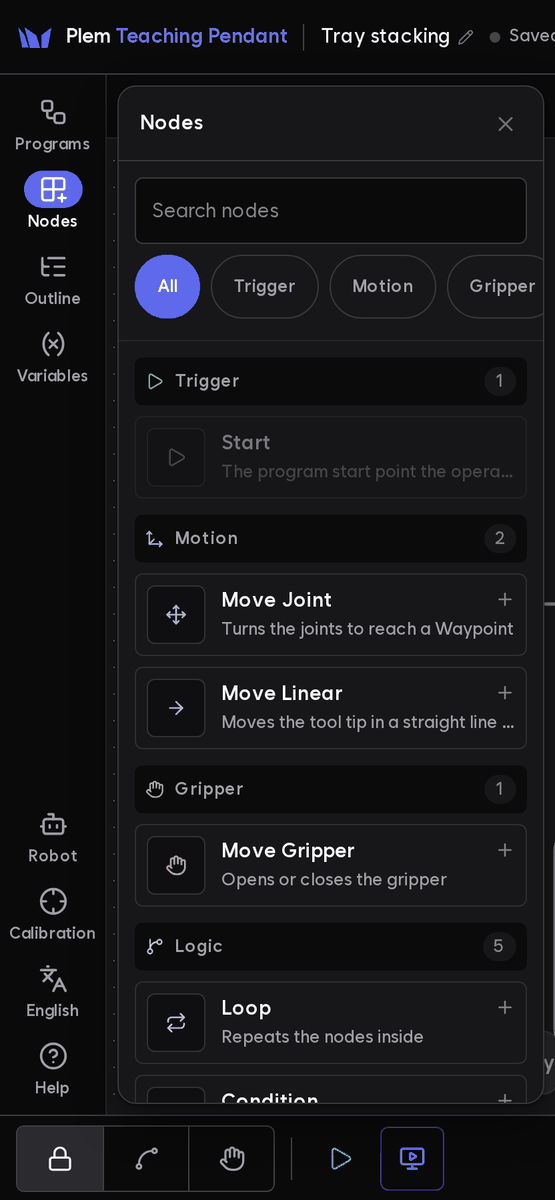
3. Add nodes
There are five ways to add a node.
| How | Where it lands | Linked | Afterwards |
|---|---|---|---|
| Tap a node's empty outlet and pick in the add picker | Right of that outlet, at its height (the nearest free spot if taken) | To that outlet | Selected, node details open |
| Drag an empty outlet's dot to an empty spot | Same as above, not where you dropped it | To that outlet | Selected, node details open |
| Tap a line, then the + above it | Right of the outlet the line leaves from | Inserted on that line | Selected, node details open |
| Tap an item in the Nodes panel | Centre of the visible canvas | No | Selected (the panel stays open) |
| Drag from the Nodes panel onto the canvas, or right-click the empty canvas → Add node | Where you dropped or clicked, kept on screen | No | Selected |
- Dragging from the Nodes panel uses the browser's drag and drop, made for a mouse. On a touch screen, tap the item instead.
- The add picker is a search box over the node list. It filters by name and description, and inside a loop or parallel it leaves out the containers you cannot put there. Keys: ↑↓ · Enter · Esc.
- If the start node is not linked yet, the first node you add links to it and … added · linked to Start shows. One undo removes the node and the link together.
- A new node never pushes other nodes; it goes to a spot where it does not overlap. Dropped on a container, it lands outside it.
- Inserted on a line, the new node's first result links to the old next node (Grasped for a gripper, the "yes" result for a condition). A node without outcomes cannot be inserted. Inserted on a loop's or lane's start line, it goes inside that container as its first node.
4. Set node values
Tap a node once to open its node details. A move node has three values for the operator to set.
| Value | Setting |
|---|---|
| Target | Pick a Waypoint from the list (below) |
| Speed | Slider from 0.01 to 1.0; 1 is full speed. Start low, run once, then raise it |
| Name | The node name shown on the canvas. Tap the name at the top of node details to change it |
How the target Waypoint behaves:
- The node keeps the Waypoint by its id (
waypoint_). Renaming the Waypoint does not break the link, and the new name shows.id - The run reads the Waypoint's pose at run time, so re-teaching the Waypoint changes the next run.
- Update to current position overwrites the chosen Waypoint with the robot's current pose. This affects every node that uses it, and asks for the same confirmation as updating from the Waypoint list.
- A node pointing to a name that is not in the list shows No such Waypoint: name, and the run is refused.
Old nodes are refused at run time, and their stored values show. Enter a name there and press Save as Waypoint: the values are registered as a Waypoint as they are, and the node points to it.
- The robot does not move.
- If the same name with the same values already exists, that name is reused.
- Values that are not complete cannot be moved this way. Pick a Waypoint from the list.
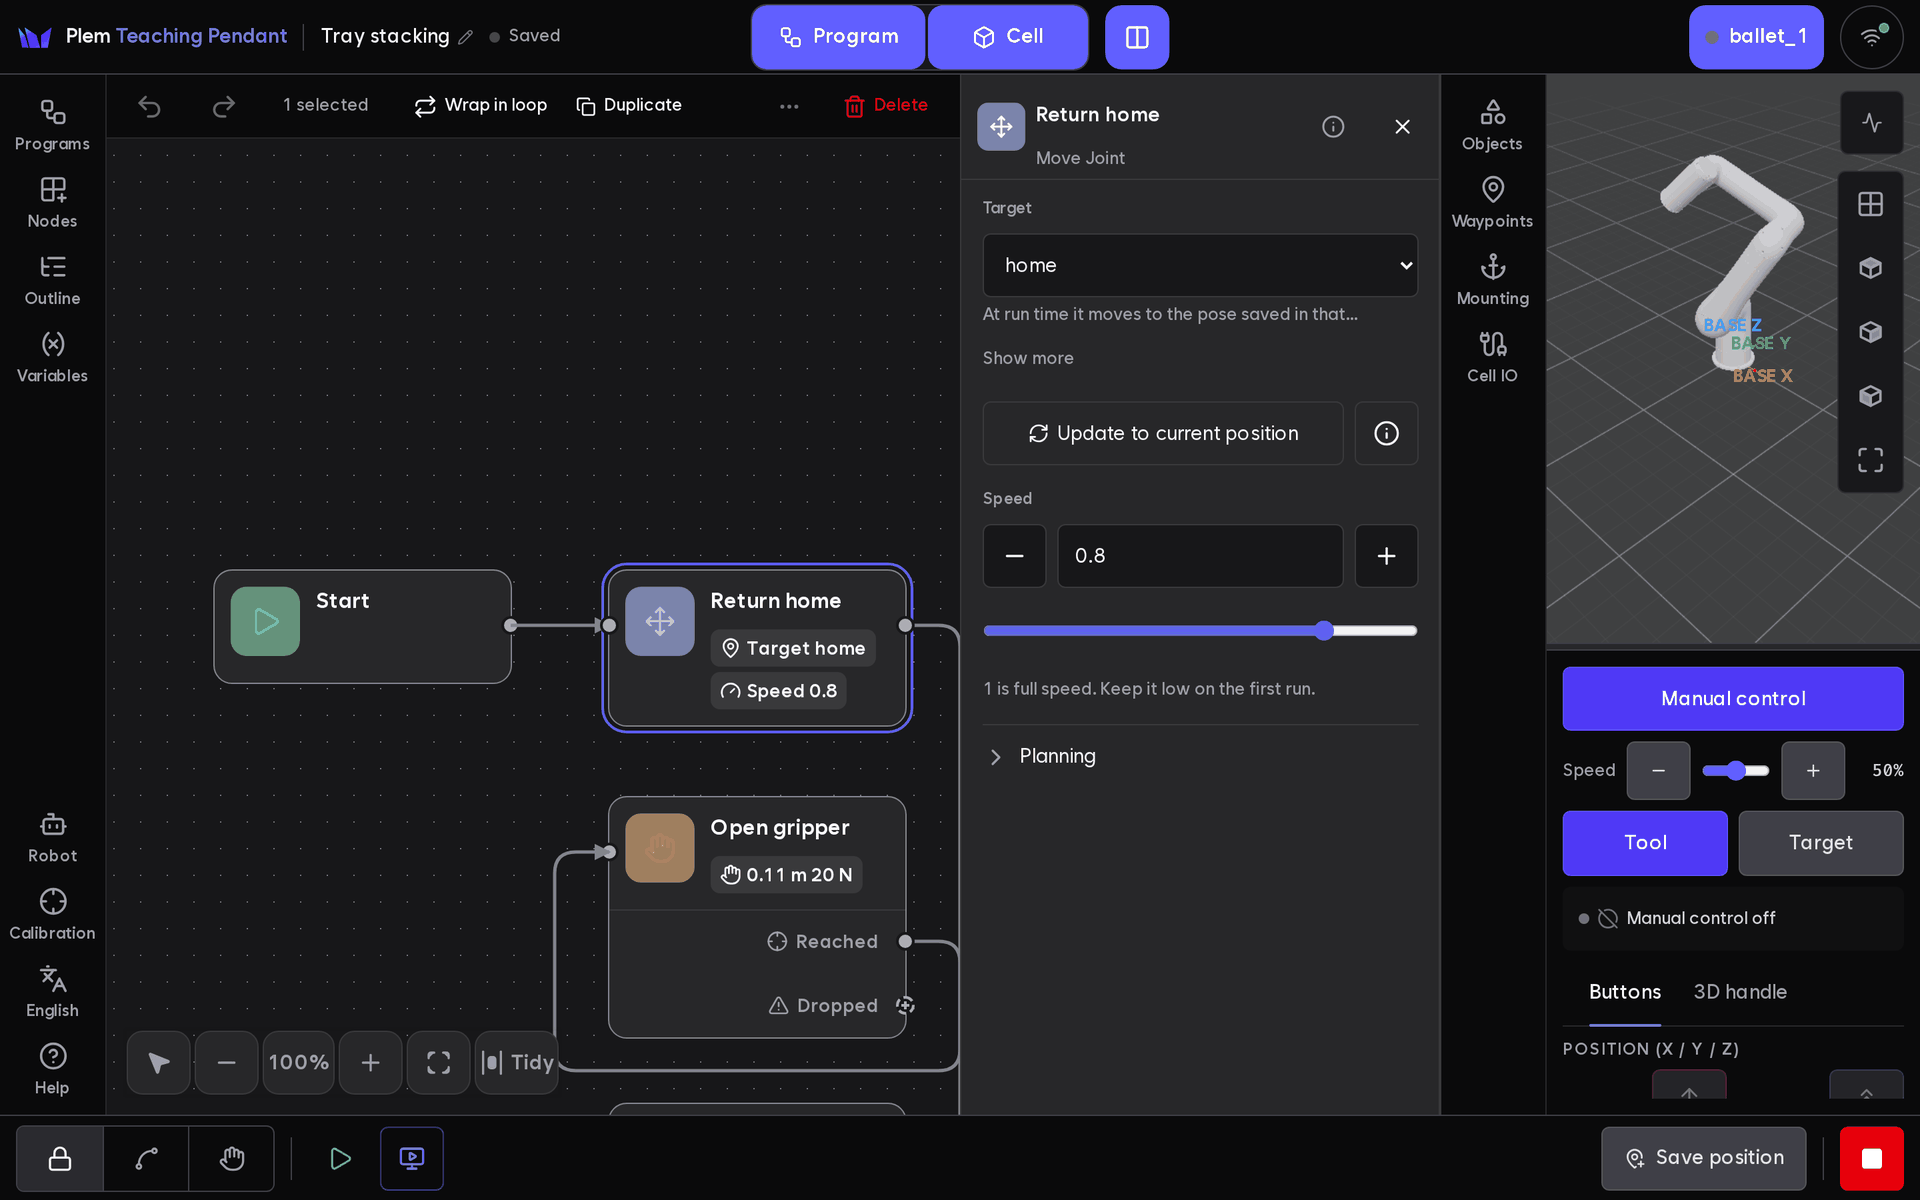
Leave the collapsed advanced groups, such as Planning and Lock TCP orientation, at their defaults. Change them only together with the support team when planning keeps failing on a particular path.
5. Link nodes
Link from an outlet on the right of a node (for example Moved) to the next node.
- Tap the outlet. The add picker opens.
- To link a new node, pick it in the picker. It lands to the right at the outlet's height, already linked, with node details open.
- To link a node already on the canvas, tap that node while the picker is open. For a node off screen, press Connect to an existing node next to the search box, move there, and tap it.
You can also drag the outlet's dot onto any part of the next node's card, or move an existing link. Changing and deleting links are in Edit commands.
An empty outlet shows as a dashed dot. It is not a warning: if that result comes up, the program ends there normally. Tapping it shows a one-line note above the picker. After the run, the completion mark on the bottom bar says which result it ended on. Only the screen that watched the run shows this; it is gone after reopening or reloading.
A gripper node has three results: Grasped, Reached and Dropped. You can link all of them or only some. What each means and where to link it is in Nodes.
A link that is not allowed is refused the moment you drop or tap, and the reason shows. While you drag, nodes you can link to get a dashed outline, the others dim, and over one you cannot link to the reason shows by your finger. The checks run in this order:
To stop linking by tap, press Cancel on the band above the canvas or Esc. A node added from an outlet inside a container lands where it overlaps nothing in that container; a loop grows downward as needed. If there is no room, no node is created and the band says why.
6. Loop
To repeat a section, select its nodes and press Ctrl+G (or Wrap in loop). They are wrapped in a loop container, and you set the Loop type in node details. The loop's header also lets you pick the type and change the count with − +. While running, the current round shows.
Adding a node never moves the others, but a wrap has to fit its frame around nodes already placed. Other nodes the new loop lands on move to its right, and nodes not in the way stay. A node that starts left of the frame stays too, so the frame's padding may overlap it. One undo restores the wrap and the moved nodes together.
| Loop type | Ends when |
|---|---|
| Count | It has run the set number of rounds |
| Always | A node inside links to the Exit loop slot on the loop's floor |
| Condition | The expression is false. It is checked before each round; when false, the loop leaves by After loop. The list offers variables only; to end on a node's result, link a condition node inside the loop to Exit loop |
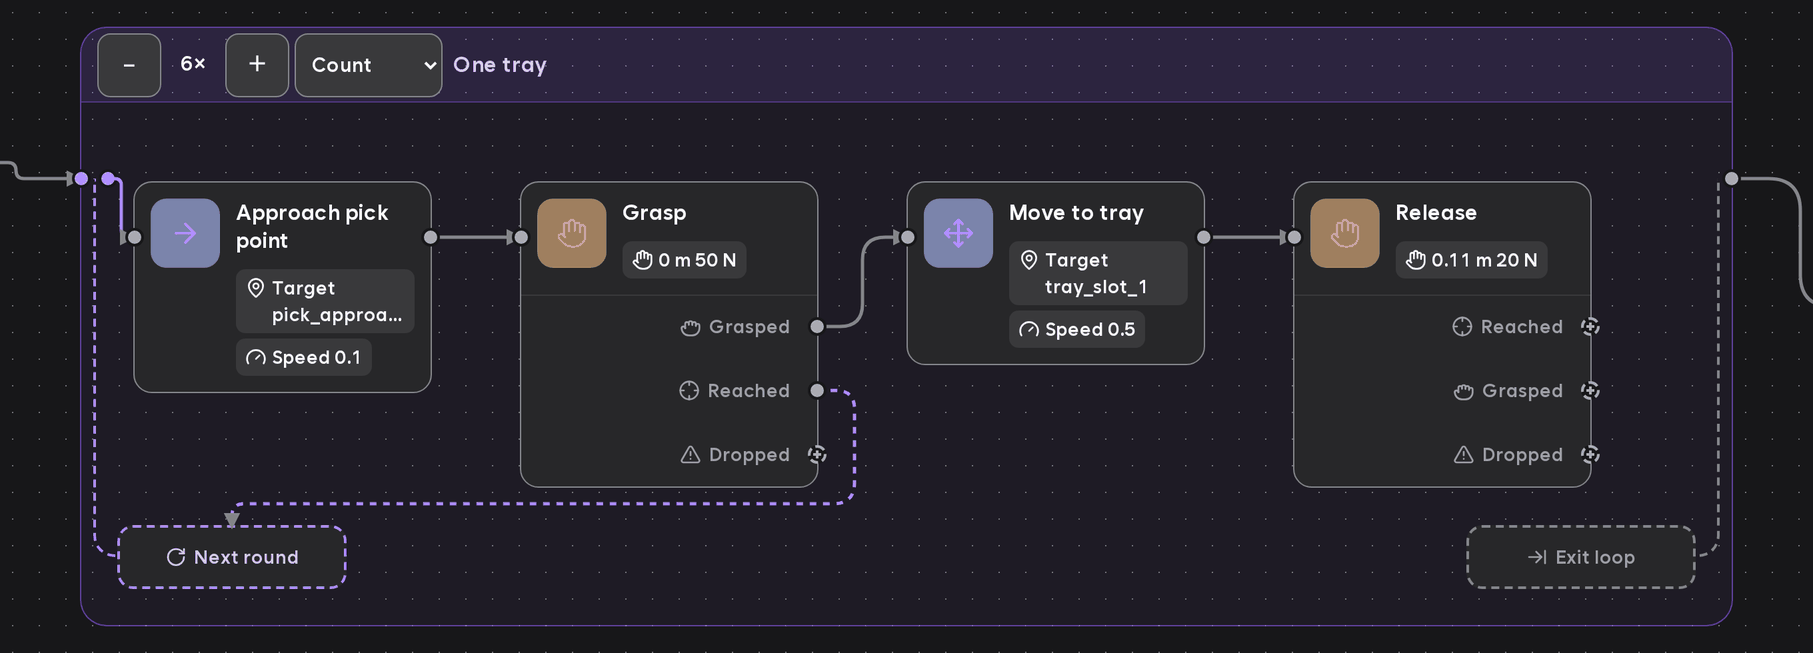
| Part of the loop | What it does |
|---|---|
| Left wall dot (purple) | Takes lines from outside and sends a line to the node each round starts at. With no start node, the loop counts as unset and the run is blocked |
| ↻ Next round slot (bottom left) | Linking a node inside here skips the rest of the round and starts the next |
| ⇥ Exit loop slot (bottom right) | Linking a node inside here stops the loop at that point |
| Dot outside the right wall (After loop) | The loop's only exit, however it ended |
An empty outlet inside the loop ends the current round there.
7. Parallel
To run branches at the same time, add a Parallel container from the Nodes panel or the picker. It is split into horizontal lanes; a new one starts with one Motion lane and one Aux lane.
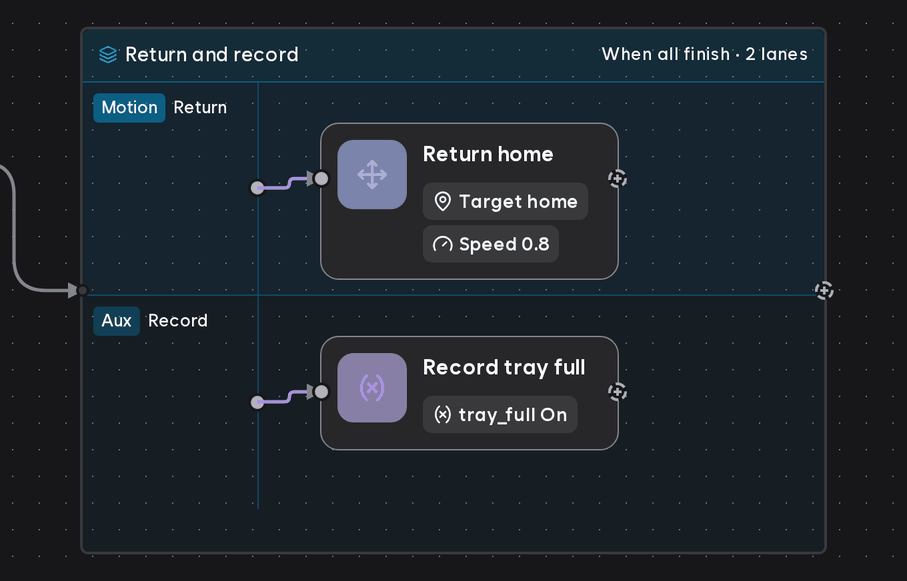
- Each lane's start slot, at its left, is the node the lane begins with. Dragging a node into a lane band puts it in that lane.
- Only the Motion lane may hold nodes that move the robot, and there is only one Motion lane. A moving node in an Aux lane counts as unset and blocks the run.
- In node details you add lanes, delete empty ones, change their kind and name, and set the Join.
- If two lanes assign the same variable, the last write stays.
- If two lanes would use the same gripper during the run, ▶ is refused. Nodes not yet linked anywhere do not count.
| Join | Behavior |
|---|---|
| When all finish | Goes on when every lane has finished. An error in any lane is an error |
| When any finishes | The first lane to finish decides the result, and the rest are cancelled. An Aux lane with nothing to wait for finishes at once and can cancel the motion, so a warning shows |
Branches in older files become lanes when opened. If branches share a node and cannot be split, an error says so.
What containers do not allow
| Rule | What happens |
|---|---|
| A loop cannot hold another container (loop or parallel) | The picker leaves them out. A loop inside a loop is a problem that blocks ▶ |
| Nothing outside a loop or lane links to a node inside it | Link to the loop's left wall dot instead; the loop hands over to its start node. An older program linked this way lists the source node under problems, and ▶ is refused |
| A lane's nodes link only to nodes in the same lane | Refused when you link |
| Wrapping needs one way in | If lines from outside reach two or more of the selected nodes, wrapping is refused with Make a single entry point first, then wrap. Rewire them to reach one node; that node becomes the start |
- Deleting a container does not delete the nodes inside; they come out.
- Dragging a node into or out of a container shows the links that will break as amber dashed lines before you drop. After the drop, Links cut: N (or Moved into the loop and similar) shows, and one undo restores positions and links.
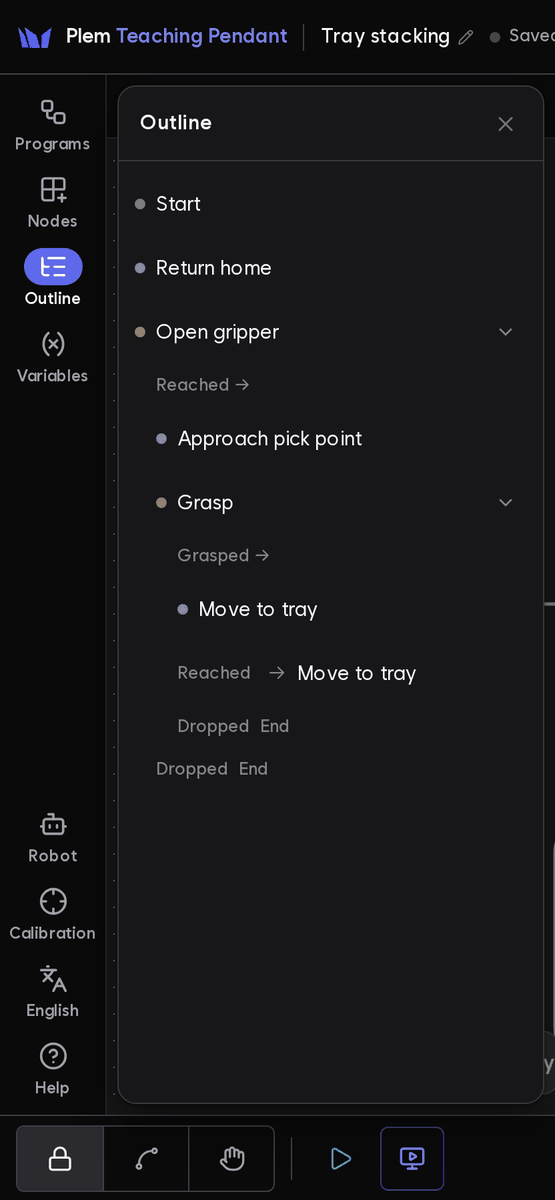
8. Outline
The Outline panel on the left is a read-only list of the open program or running Job, unfolded from the start node. One line is one node. Steps in a row stay in the same column; only the inside of loops and parallels and the branches of a node with two or more outlets are indented, under a line with the outlet's name.
| Outlet line | Meaning |
|---|---|
| End (End of loop in a loop, End of lane in a lane) | Not linked anywhere |
| → Next round · → Exit loop | Goes to that slot on the loop's floor |
| → name | Goes back to a node already listed above |
- Loops, parallels and nodes with branches fold with ▼.
- Nodes the start cannot reach are under Unreachable, with the container they are in if any.
- Tap a line to select that node on the canvas and move the view there.
- While running, the line of the current node is highlighted and the list follows it.
9. Check
When something needs fixing, Problems: N shows at the top right of the canvas. Tap it for the list by node; tap a row to open that node's details at the field with the problem. A bad value shows right under its field, and a problem with no field shows one line under the node details header. When ▶ is refused, the list opens by itself (Run). An edit the editor refuses shows as a warning row at the top of the list, with ✕ to dismiss it. It does not count toward Problems: N and does not lock ▶. If nothing else needs fixing, the button shows ⚠ with no number.
Now go to Run.
Edit commands
Edits are commands. Each one is on the right-click menu of a node or the empty canvas, on the command bar above the canvas for touch, and some on keys (Shortcuts). A command that applies but cannot run now is drawn dimmed, and pressing it says why. One command is one undo step.
| Command | On touch |
|---|---|
| Undo · Redo | Command bar, left ↶ ↷ |
| Delete | Command bar, right end; or 🗑 beside a selected link |
| Duplicate | Command bar |
| Wrap in loop | Command bar |
| Unwrap loop | Command bar, with one loop selected |
| Move out (of a loop) | Command bar ⋯ |
| Copy · Paste | Command bar ⋯. With nothing selected, Paste is on the command bar itself |
| Tidy | Canvas view buttons |
| Deselect | Command bar ⋯ |
| To do this | Do this |
|---|---|
| Select nodes | Tap. Several: Shift+click or Shift+drag, or the selection mode button among the view buttons. On touch, long-press to select |
| Move a node | Drag |
| Open node details | Tap once, or select and press Enter |
| Change a link | Tap a linked outlet → Change target…, drag a linked outlet's dot onto another node, or select the line and drag one of its ends. The target end goes on another node, the source end on another outlet's dot (Now starts from name). Dropping an end on empty space deletes the link and offers undo |
| Delete a link | Tap the outlet → Unlink, or select the line and press Delete or the 🗑 |
| Insert on a line | Tap the line, then the + above it |
| Tidy | Tidy among the view buttons lines the nodes and containers linked from the start node up left to right. The start node's place, links, values and container insides stay; one undo puts it back. It is dimmed, with the reason, below 100% zoom, while node sizes are being measured, when an unlinked node is in the way, or when the structure has a problem such as a cycle |
| Zoom | Wheel, two fingers, or − + among the view buttons, 25–150%. Tap the % between them for 100%. Below 100% the canvas is an overview only: link points and slots are off, and tapping a node zooms to 100% around it. Below 75% card titles shrink to one line and outlets to icons; below 50% titles go too |
| Fit all | ⤢ among the view buttons. Opening a program shows the area around the start node at a readable zoom |
Undo keeps the last 100 steps.
Saving and the list
Edits save to the server automatically 0.5 s after you stop; there is no save button. The save state is always next to the program name in the header (Saved · Save pending · Saving · Not saved). If a save fails, an amber Not saved shows with Retry or the reason.
In Programs on the left, everything except tapping a row and the arrow is in the row's ⋯ menu. Actions that cannot be undone ask once more inside the menu; closing the menu cancels.
| Action | What it does |
|---|---|
| Tap the row | Opens the program |
| ⋯ › Rename | Renames it. Shown only for the open program |
| ⋯ › Duplicate | Makes a copy of the latest saved version named " |
| ⋯ › Export as JSON file | Downloads a .workflow. file as a backup. There is no import |
| Arrow at the right of the row | Folds the program's finished Jobs in and out under the row; the row's Jobs N is their count. Shown only when there are some (Run) |
| ⋯ › Delete | Confirm with Confirm delete in the menu |
When you connect, the most recently edited program opens. Editing is locked while running or while a Job is open. To edit, stop, then press Edit (pencil) on the band above the canvas, or open the program again from the list.