Robot Control
Press Start on Start session and this screen opens. Press s to launch the stack. When the launch finishes, the screen fills in as below.
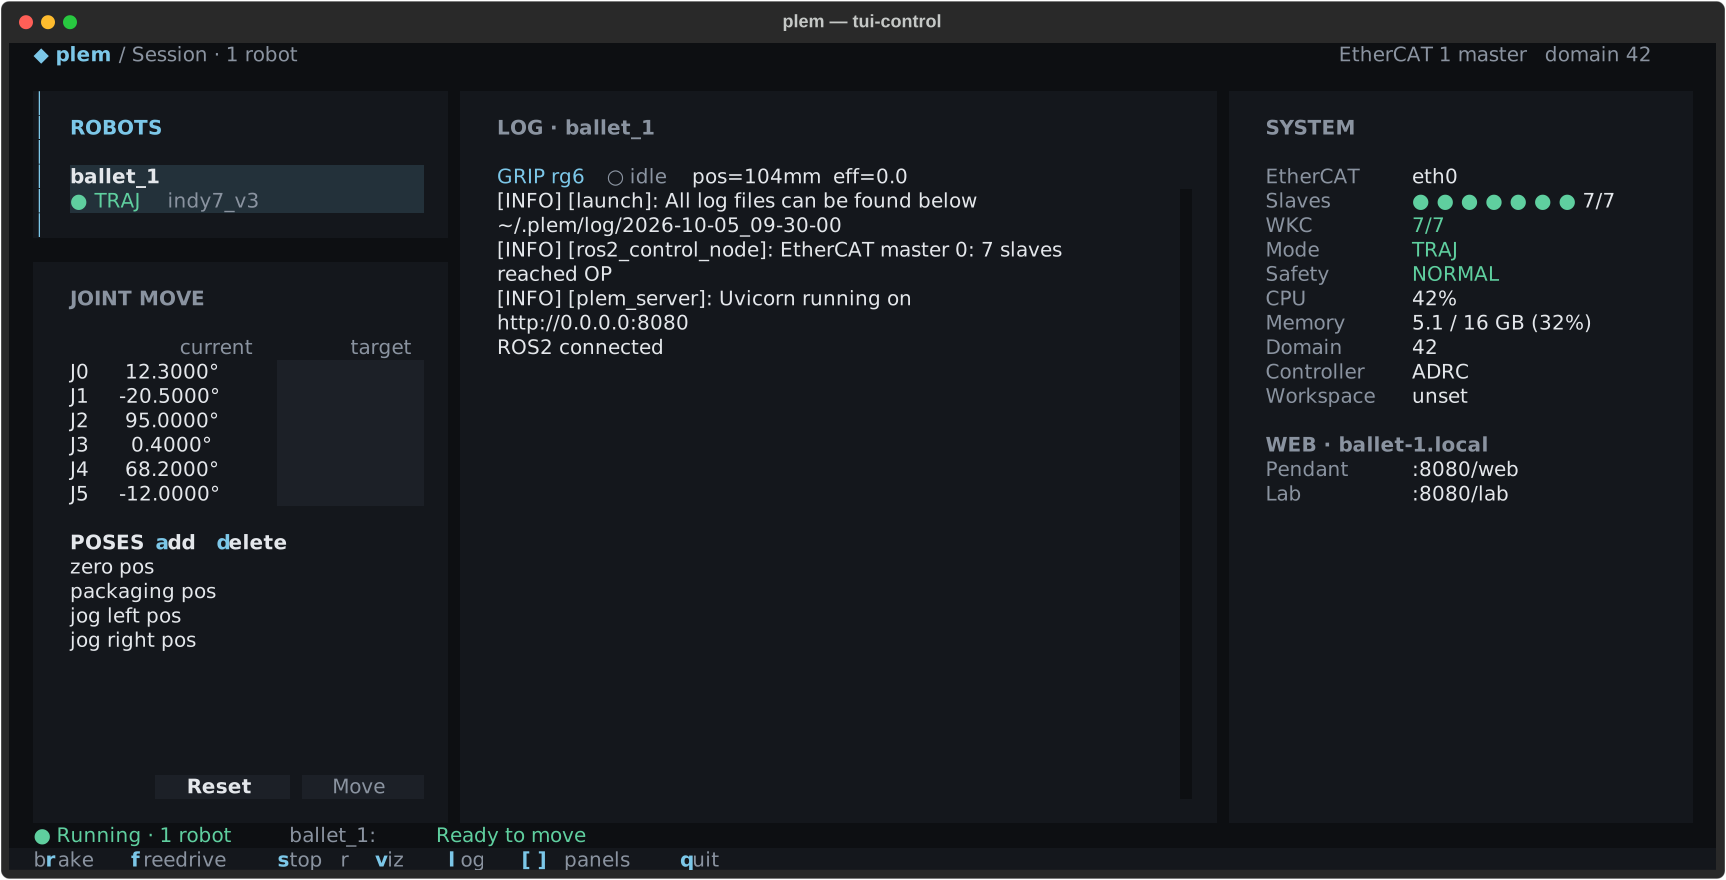
| Area | What it shows |
|---|---|
| Header | Screen name (Session · N robots), EtherCAT master count, ROS domain and installed version. ↑0. next to the version means a newer version exists (Update) |
| ROBOTS (top left) | The launched robots, two lines each: the name, then the link dot, mode and model |
| JOINT MOVE (bottom left) | Joint targets and moving to saved poses |
| LOG (middle) | Gripper and F/T sensor chips, the stack log and robot events |
| SYSTEM (right) | EtherCAT, mode, safety state, slaves, CPU and memory, ROS domain, controller, workspace, web addresses |
| State line (first line at the bottom) | One sentence on what is true now (below) |
| Key bar (last line) | The keys you can press now. Only the key letter is coloured |
The state line reads one of these.
Not running — press s to start: the stack is off.- Green
● Running · N robots, followed by the selected robot's mode in words:Brakes on·Ready to move·FreeDrive · move by hand·Stopping·Error, in the same colour as the robot list. - While stopping: an orange spinner and the current step (Stopping the stack).
- Bold red
■ P-STOP on <robot>: a Protective Stop. - Bold red
✖ EtherCAT link down · <robot>: the selected robot lost its link. When another robot's bus goes down, that robot shows P-STOP.
When the window is narrower than 130 columns, the SYSTEM pane folds away. The Protective Stop and link-down sentences still appear on the state line.
SYSTEM
] shows or hides this pane. On a narrow window it starts folded, so open it with ].
| Row | Shows | Meaning |
|---|---|---|
| EtherCAT | eth0 / red ✖ eth0 | The bus interface. A red ✖ means the link is down |
| Slaves | ● ● ● ● ● ● ● 7/7 | One dot per EtherCAT device on the selected robot's master, servo drives and other devices alike. Green = running (OP), orange = starting, red = link down or error. The numbers are running/total |
| WKC | 7/7 green / red | EtherCAT working counter (current/expected). It need not equal the device count. Red means some devices missed this cycle |
| Mode | TRAJ green · FREE orange · BRAKE grey · STOP orange · ERR red | The selected robot's mode: Trajectory · Freedrive · brake · stopping · error |
| Safety | NORMAL green / P-STOP red | Protective Stop or not. On red, see Stops and recovery |
| CPU · Memory | 42% · 5.1 / 16 GB (32%) | Device load, refreshed every 3 seconds |
| Domain | 42 / red 0 · shared | The ROS domain applied to this plem run. Red means none is set and the default 0 is in use. A value changed in Settings shows here only after plem is run again |
| Controller | ADRC · PID · Plugin <file> | The selected robot's torque controller |
| Workspace | unset · ~/ · ~/ · ~/ | The registered user workspace and whether it is built |
WEB · <device address> | Pendant :8080/ · Lab :8080/ | The web tools to open from another computer's browser while the stack runs. A tool turned off in Start session is not listed |
Robot list
Each robot takes two lines: its name in bold, then ● <mode> <model>. The model is the robot model in its profile.
- A green
●means ROS 2 is connected. A grey○means not yet. - During a Protective Stop the mode reads red
P-STOP. In the recovery Freedrive it readsFREE P-STOP: the brakes are open and the arm moves by hand. - With several robots,
←moves focus to the list and→to the log. The robot you select is the target of joint moves and the log. [hides or shows the whole left column.
Brake and Freedrive
r releases the brake into Trajectory (TRAJ), and from any other mode it brakes. f switches between brake and Freedrive (FREE), where you move the arm by hand. The key bar names what each key will do next, for example release brake or end freedrive.
r while the robot movesr during motion requests the brake, and the robot can stop abruptly. Do not treat the robot as stopped until the robot row and SYSTEM Mode show BRAKE (state line Brakes on).
f enters Freedrive only from the brake.
- From Trajectory it only brakes first and shows
Braking first. Press f again after BRAKED to enter FreeDrive.Pressfagain once braked. - Before launch it shows
Press s to launch first. - While connecting it shows
ROS2 connecting — try again in a moment.
After a switch is accepted, the TUI checks the hardware state again. If one of these lines appears in the log, follow Stops and recovery.
- During a Protective Stop:
mode change acknowledged but PROTECTIVE_STOP is active — motion will be blocked by hardware. - A joint outside its design range:
… joints beyond URDF design range … Press [R] to attempt FreeDrive recovery.
Releasing the brake with r lets the robot take commands. Make sure no people or objects are in its reach, and stay within reach of the Emergency Stop. No key on this screen replaces the physical Emergency Stop.
Joint move
In JOINT MOVE at the bottom left you type joint targets or move to a saved pose. It works only when the stack was launched with Motion planning, and the robot moves only in Trajectory (TRAJ).
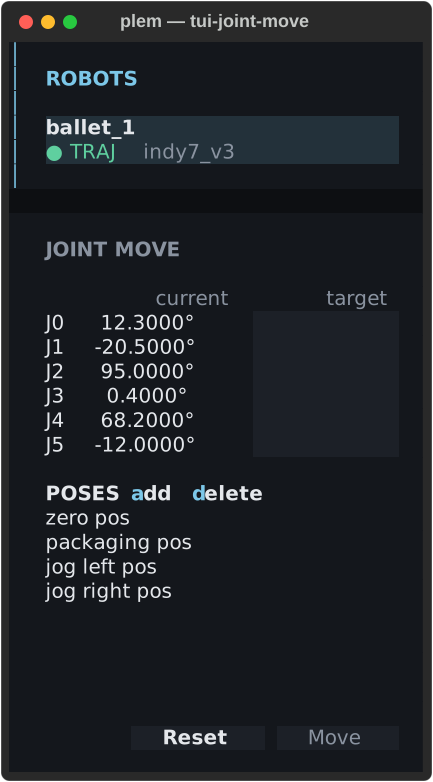
Saved poses are the poses list in ~/.. On the first run four default poses are written there; after that the file is used as it is, so you can add or delete here or edit the file. If you delete them all, the list stays empty and the defaults do not come back.
Typing targets
- Type target angles in degrees in the
targetcolumn. A blank joint keeps its current position. - Press Move, or
Enterin a field. Reset clears the inputs. - The result appears on the line just above Reset and Move. On success the inputs clear; on failure they stay.
Success means the planner accepted the command.
- This pane does not show progress or completion, and there is no cancel. Watch the
currentcolumn reach the target and stop. - Other controls are not blocked once the command is accepted. Until you see the robot stop, do not start anything else that moves it: a Pendant run, a jog, a calibration.
A value that is not a number turns red, and not a number appears below. A value outside the joint limit shows the allowed range. The move goes to the target in one motion, so a large angle change makes a large motion. Clear the reach first.
Target fields take only digits, a sign and a decimal point. Every other key acts as a screen key even with the cursor in a field: r brakes, s stops, q quits, a and d add and delete poses.
Poses
| Action | What it does |
|---|---|
↑ ↓ on the list | Previews that pose's values in the target fields. If you typed values yourself, they are kept and edits kept — enter loads '…' appears |
Enter or click on the list | Fills the target fields with that pose. Asks before overwriting only if you typed values yourself. The robot moves only when you press Move |
a | Saves the target values as a new pose. Every joint must be filled |
d | Deletes the highlighted pose, after confirmation |
The four default poses are for 6-axis robots whose joints are named joint0–joint5, which covers every supported model. The screen shows them as J0–J5.
| Pose | J0 | J1 | J2 | J3 | J4 | J5 |
|---|---|---|---|---|---|---|
| zero pos | 0 | 0 | 0 | 0 | 0 | 0 |
| packaging pos | 0 | 0 | 158 | 0 | −158 | 0 |
| jog left pos | −20 | −40 | −110 | −20 | 40 | 0 |
| jog right pos | 20 | 40 | 110 | 20 | −40 | 0 |
When the pane is unavailable, it says why and hides Reset and Move.
Available once the robot is running.waiting for ROS2 connectionMoveIt disabled for this launchwaiting for joints / URDFURDF arm chain unresolved — Joint Move disabled (see log)
Log
The LOG pane mixes two streams.
- The output of the launched stack, always shown.
- Robot events (link, mode, safety, limits), for the selected robot only.
The screen keeps the last 1000 lines, and the log is also written to files under ~/.. Where to find them is in Troubleshooting › Asking for support.
| Prefix | Meaning |
|---|---|
[RT] | A real-time control loop event (PROTECTIVE_, BRAKE_, PROTECTIVE_ and others), with severity= INFO · WARN · ERROR · CRITICAL. Repeats of the same event within 5 seconds are folded, and their count follows as (xN more in 5s) |
[SAFETY] | A safety state change, for example [SAFETY] NORMAL → PROTECTIVE_ |
[LIMIT] | A joint left or came back inside its design range |
[RECOVER] | Progress of an R recovery |
[CRASH] | A stack process ended unexpectedly |
[ERROR] | A stack management error: a failed pre-launch check (no EtherCAT slave found, for example), a process that failed to start, an abnormal exit |
[measured] | The kinematics applied to the robot at launch: geometry: measured record applied (measured <date>) or geometry: model nominal (<model>). rejected: means the measured values failed validation and the launch stopped (Stops and recovery) |
- Drag with the mouse to copy the selected lines to the clipboard of the screen you are looking at (Copying log lines).
- While scrolled up, new lines do not pull the view down.
Enterjumps back to the latest line. lcycles the log detail throughinfo → debug → warn → err. It is saved and applies from the next launch.
Copying log lines
Over SSH, the selection is sent to your laptop's terminal (OSC 52). Whether it arrives depends on the terminal.
| Terminal | Receives the copy |
|---|---|
| Windows Terminal · VS Code · WezTerm · kitty | Yes |
| iTerm2 | Once clipboard access is allowed |
| GNOME Terminal | No. Connect with ssh -X instead |
| tmux 3.3 or later, on the device or the laptop | Only with set -g set-clipboard on in that tmux's ~/. |
After a copy the TUI says how it went: Copied to clipboard when a clipboard tool (xclip or similar) took it, Sent to the terminal clipboard (needs a terminal with OSC 52) when it was only sent to the terminal.
Gripper and F/T chips
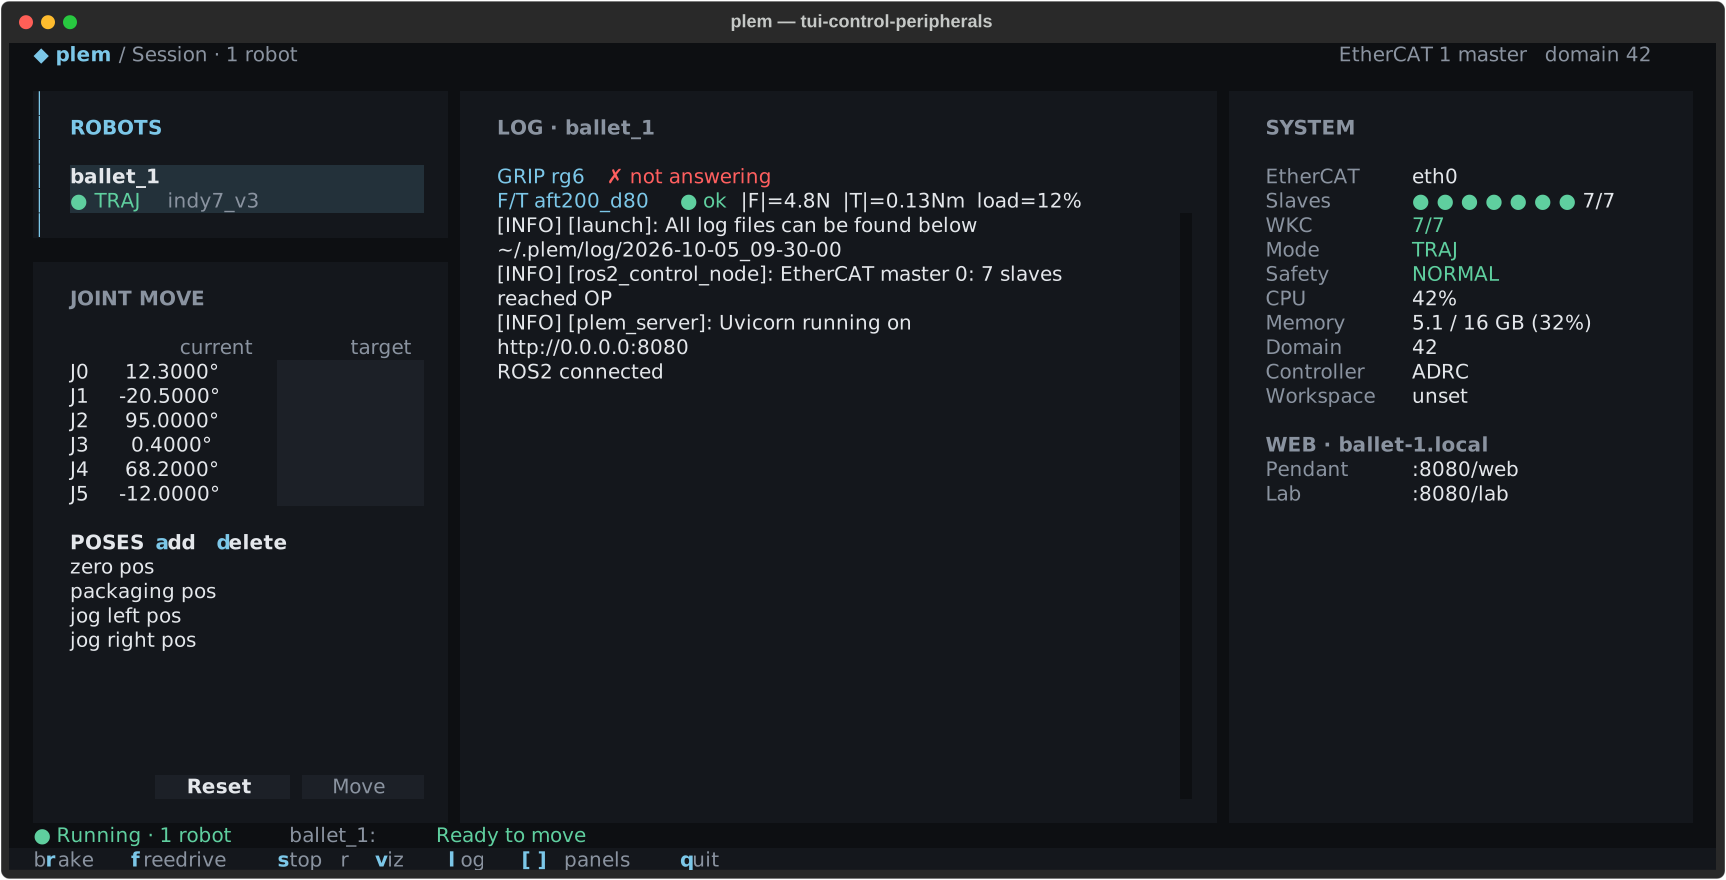
A robot with a gripper set shows a GRIP <model> chip above the log. A robot with an F/T sensor set shows an F/ chip on its own line below. The gripper chip adds the position (pos=…mm) and force (eff=…) after the state.
| Chip | Shows | Meaning |
|---|---|---|
| GRIP | ○ idle | Idle, nothing held |
| GRIP | ● grip | Holding an object |
| GRIP | ⋯ busy | Moving |
| GRIP | ✗ ERROR | Gripper error |
| GRIP | · waiting for /gripper_ | No state received yet |
| GRIP | ✗ not answering | The gripper does not answer. Check the cable and tool power. The chip recovers by itself once the gripper answers again |
| F/T | ● ok |F|=… |T|=… load=…% | Normal: force and torque magnitude, and load against the rating |
| F/T | yellow ▲ <sentence> · red ✗ <sentence> | Warning · error, with the sensor's own status sentence |
| F/T | · no signal | No signal yet |
Reading F/T values is covered in F/T sensor.
RViz and PlotJuggler
v opens or closes MoveIt RViz; it is available only when the stack was launched with Motion planning. p opens or closes PlotJuggler and does not appear in the key bar. Without a monitor on the device, no window opens. Stopping the stack closes both.
All keys
The key bar shows only the keys that fit the moment. On a narrow window, keys at the end drop off first; they still work. With the Korean input method on, the key in the same position works too. Keys are case sensitive: r is the brake and R (Shift+r) is recovery.
| Key | Korean | What it does | In the key bar |
|---|---|---|---|
s | ㄴ | Launch · stop the stack | Always (start / stop) |
r | ㄱ | Release brake into Trajectory · brake | After launch |
f | ㄹ | Brake ↔ Freedrive | After launch |
R | ㄲ | Recover | Red, only when recovery is needed |
a · d | ㅁ · ㅇ | Add · delete pose | Inside JOINT MOVE |
[ · ] | same | Show or hide the left column · SYSTEM | Always |
l | ㅣ | Log detail | After launch |
v | ㅍ | RViz | Launched with Motion planning |
p | ㅔ | PlotJuggler | Not shown |
← · → | — | Focus the robot list · the log | Not shown |
, | — | Settings | Before launch |
q | ㅂ | Quit. A second q forces it (Quitting) | Always |