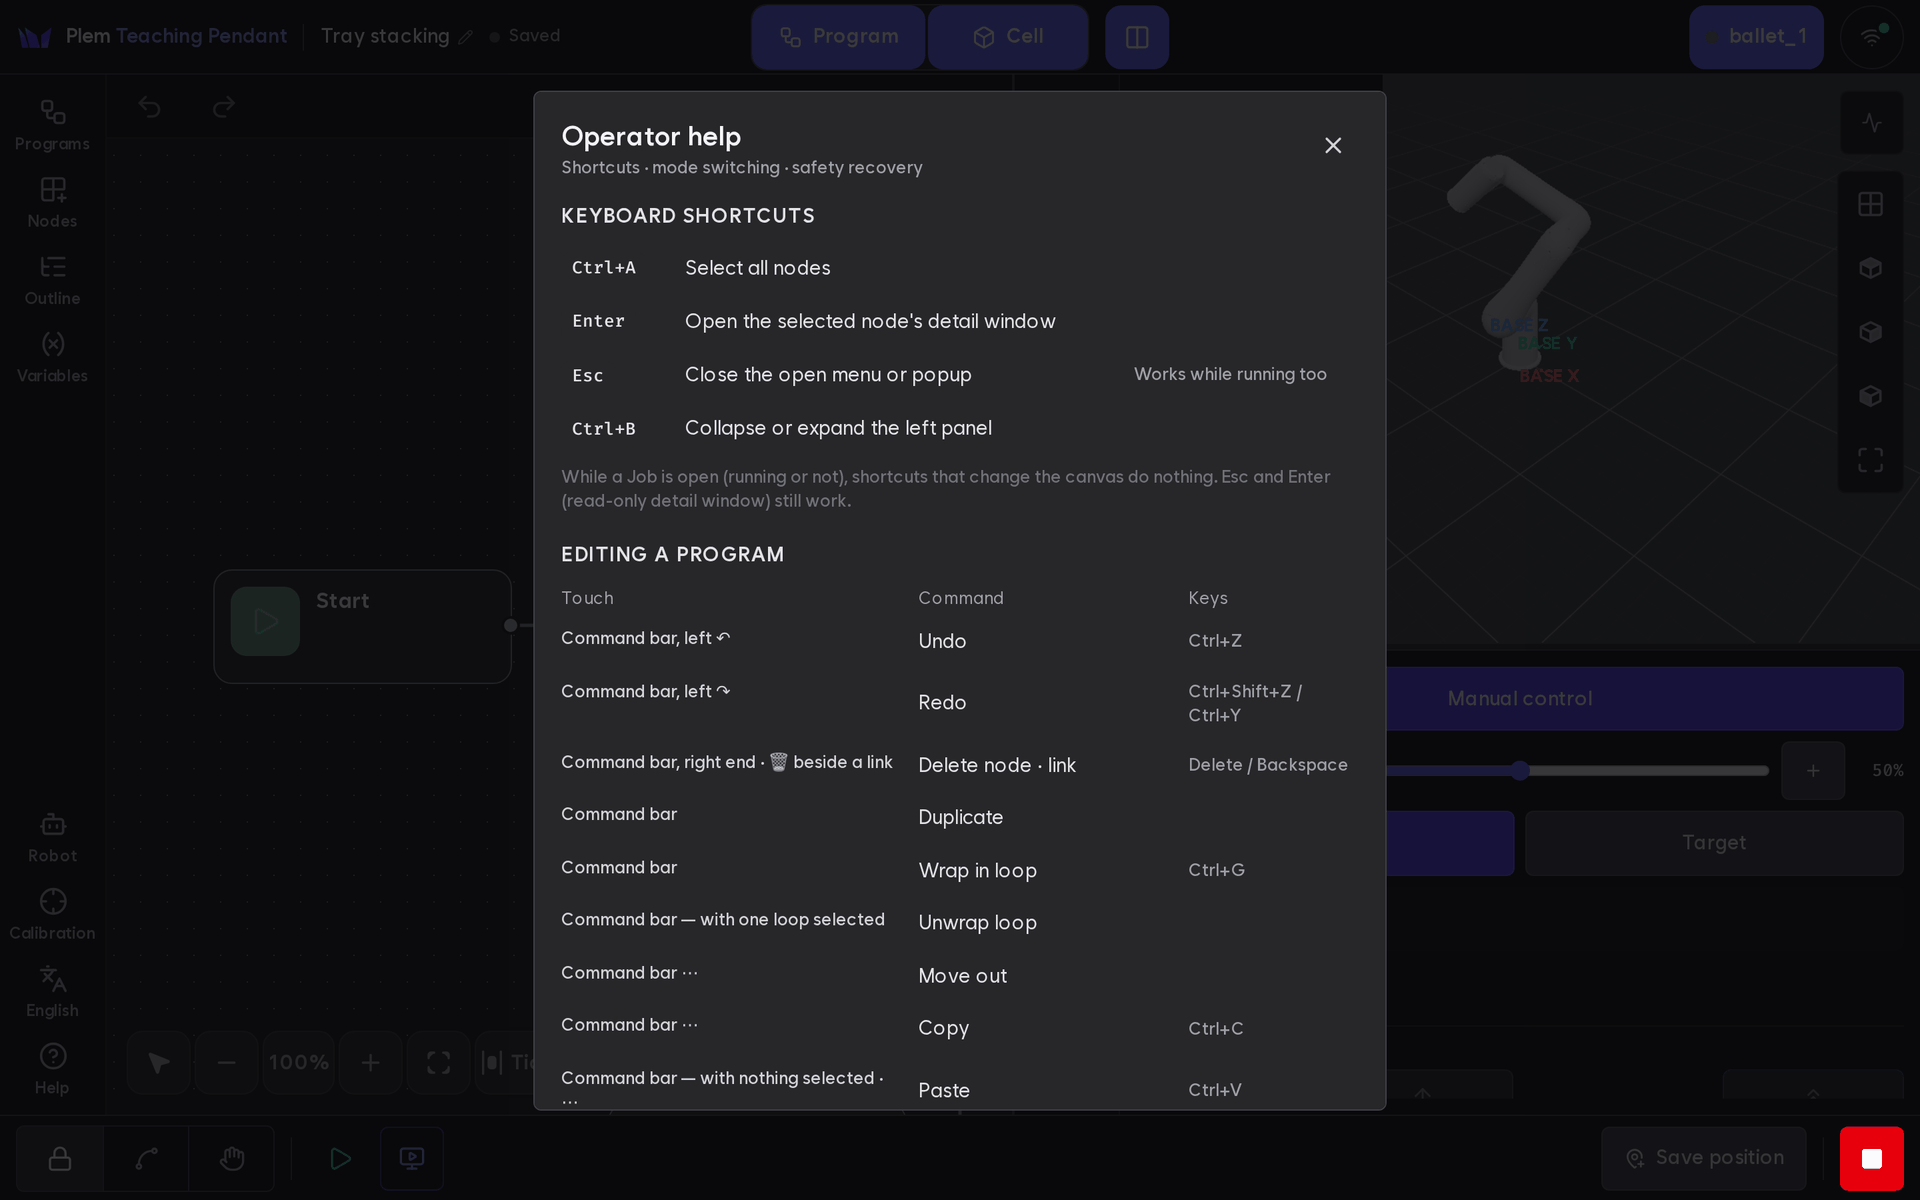
Screen layout and shortcuts
Top bar
The top bar says only what you are looking at. From left to right:
| Item | What it does |
|---|---|
| Program name | Tap to rename. While a Job is open, the Job's name and state show instead |
| Save state | Always next to the program name: Saved · Save pending · Saving · Not saved (amber, with Retry or the reason) |
| Program · Cell tabs | In the middle. Each shows one pane full screen (Panes) |
| Split view | Icon button right of the tabs. Shows both panes side by side; press it again to go back to the tab you had |
| Connection | Status icon (table below). Tap it to see Robot (rosbridge), Server (/plem), Run channel and Server requests (REST) with their state and last change time |
| Connection icon | Meaning (hover text) |
|---|---|
| Wi-Fi icon with a green dot | All connected (Connections OK) |
| Spinner | Nothing is down, but something is still connecting or has never been asked (Checking connections) |
| Red icon with a count | At least one is down (Connection problems: N) |
Server requests shows the result of the last request; its state after that is known only once the next request goes out.
Robot control bar
Robot mode, run and stop sit on the bottom line of the screen and stay there on every screen.
| Item | What it does |
|---|---|
| BRAKED · TRAJ · FREE | Robot mode, as icons only: lock = BRAKED, curve = TRAJ, hand = FREE. The name shows as a tooltip on mouse hover, not on touch. See Moving the robot |
| P-STOP ↻ | Appears next to the modes only during a Protective Stop, and the top edge of the bar turns amber. Tap the chip for the explanation; ↻ asks to recover. See Run |
| ▶ ⏸ ⏹ | Run. With a program open, ▶ validates it, makes a Job and starts it. With a Job open, ⏸ ⏹ control that Job (Run) |
| ⏹ and ■ | The outlined ⏹ is Stop run: it cancels the motion and does not brake. The red ■ at the right end is Stop: it also brakes (Moving the robot) |
| Errors | The count of node errors in the Job and failed runs or commands, shown only when there are some. Tap to open the list; tap an entry to go to its node. Problems in the program you are editing are under Problems: N on the canvas, and connection trouble is under the connection icon |
| F/T warning | On a robot with an F/T sensor, F/T warning or F/T sensor error appears while the sensor reports one. On a crowded bar it hides, and the F/T chip keeps the state |
| Save position | Just left of Stop. Saves the current pose as a Waypoint with an automatic name such as P1, with no dialog (Moving the robot). On a narrow screen only the pin icon shows |
During a Protective Stop the bar locks TRAJ, ▶ and Jog. Which buttons stay usable is listed in Run, and which modes you can still press in Moving the robot.
Panes
| Pane | Contents |
|---|---|
| Left rail | Programs · Nodes · Outline · Variables, and lower down Robot · Calibration (Left rail). Always there, whichever tab is open |
| Program | The program canvas. Opening a new calibration measurement puts the camera view here. With the Program tab alone, a small Robot preview at the bottom right shows the robot's current pose; tap it to open the Cell tab |
| Cell | A section bar (Objects · Waypoints · Mounting · Cell IO), the 3D view, and Jog to its right. Tap a section to open it beside the bar; tap it again to close it. The sections are Cell objects, Waypoints, Mounting and Cell IO. Jog shows only in configurations where it is active |
Drag the border between the 3D view and Jog to widen Jog. The button on the Jog header collapses it to a thin strip, and the 3D view takes the width. This is remembered on the device. Collapsing stops any Jog in progress and ends manual control. In a narrow pane or a portrait screen, Jog moves below the 3D view and cannot collapse.
The tabs in the middle of the top bar show one pane full screen; Split view shows both. The view is set by the border between the panes: drag it to an end and you get that tab.
| View | How you get it | Notes |
|---|---|---|
| Program | Program tab, or drag the border all the way to the cell side | Node details open as a side panel at one of two widths. The left panel and node details open together only at the narrower width |
| Cell | Cell tab, or drag the border all the way to the program side | Going here closes an open left panel. Tapping the rail then shows the program pane only while that panel is open |
| Split | Split view, or the first time the Pendant opens (half and half) | The border is a plain line: drag it to resize, double-tap it for half and half. Only the panel opened last stays open, the left panel or node details |
- Starting a run with the Program tab alone switches to split. Nothing switches back afterwards.
- While the calibration camera view is up, asking for the Cell tab alone gives split instead, so the camera's stop button stays visible.
- If releasing manual control is not confirmed while only the Program tab shows, the Cell tab gets an amber dot. Open Cell and press Turn off manual control again.
- While a confirmation dialog is open, only the dialog and Stop on the bar respond, by keyboard too.
- The last tab, split and sizes are remembered in the browser. The left panel starts closed.
Mounting
Mounting sets where the robot base stands on the cell floor: X · Y · Height in mm and Heading in degrees. Each field shows the running value in grey, and an edited value shows as a ghost in the 3D view. Save writes it to the cell. The 3D view, planning and the controller use it from the next stack start; until then Restart pending and Restart robot stack stay on screen. Tilt for wall or ceiling mounting is not available yet.
Protective Stop height in the same section is off at first. Turn it on and enter a height in mm, measured the same way as the mounting height. When the lowest point of the robot's and tool's collision shapes goes below it, the controller trips a Protective Stop. This also applies to commands that skip planning. A height above the mounting height is refused with the reason. It also applies only after a restart. It is separate from the floor in Objects, which plans and Jog do not cross.
The robot travels a little further before it stops, so leave a margin. In Freedrive the height trips a Protective Stop, but the arm still moves by hand.
Left rail
Each rail item opens one panel that floats over the canvas. Tap the same item or the panel's ✕ to close it; Ctrl+B also opens and closes it. Another item switches to its panel. The Nodes panel stays open as you add nodes.
| Item | Shown | Contents |
|---|---|---|
| Programs | Always | Programs with their Jobs below; the open one is marked Open. A running Job is pinned at the top, programs follow the most recent Job, and Jobs whose program was deleted are grouped at the bottom. Running again changes a row's result, so this is not a run history. See Saving and the list and Run |
| Nodes | Always (dimmed while a Job is open) | The node palette, narrowed by search and category chips (All · Trigger · Motion · Gripper · Logic · Cell IO) |
| Outline | Always | Outline |
| Variables | Always | Variables |
| Robot | Always | Settings |
| Calibration | When the session names a camera model (stack launched with the camera) | Hand-eye calibration |
Below them are the language button (Teaching Pendant), Help (shortcuts, robot modes, recovery) and the installed PLEM version, for example v0.11.0.
3D view
The 3D view in the cell pane shows the robot's current pose live.
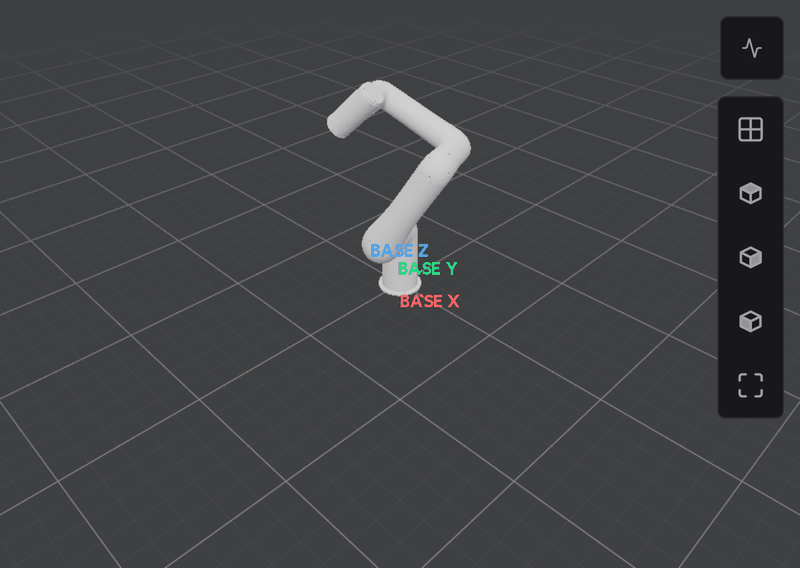
| What you see | Meaning |
|---|---|
| Robot model | Follows the joint values |
| BASE X · Y · Z | Robot base axes (red · green · blue) |
| TCP axes | Tool axes always drawn at the tool tip (red X · green Y · blue Z). Hidden while you hover or press the X/Y/Z buttons on the Jog Tool tab |
| TCP direction target | Only while you edit with Lock TCP direction while moving on in node details: target axes (pink X · amber Y · teal Z, labeled TCP direction) and the allowed-tilt cone |
| Cell objects | Display objects as surfaces, collision-only objects as lines, the selected object in indigo. Planes are drawn faintly up to the grid size (4 m) |
| Target ghost | The pose about to be reached, in see-through. A chip at the top left says whose it is (Resume position, Joint target, Cartesian target or a Waypoint name) and its state (Preview · Reachable · Near singularity · Unreachable · Collision · Moving) by color, icon and text. Only one shows: a target being moved to first, then the resume pose while waiting for recovery (Run), then the latest one chosen (Moving the robot) |
| Running node | While the open Job runs or waits for recovery, its state and current node at the top left |
| F/T chip | F/T sensor |
| Jog guide | With manual control on, hovering or pressing X/Y/Z · Rx/Ry/Rz on the Tool tab shows that axis |
| View control | Mouse | Touch |
|---|---|---|
| Rotate | Left drag | One finger |
| Zoom | Wheel | Two fingers |
| Pan | Right drag | Three fingers |
The button at the top right overlays the joint values as numbers.
The buttons below it set the view. Top view, Front view and Side view turn the camera to look from above, the front (+X) or the right (−Y) and fit the robot and cell objects, wherever the camera was. Fit all keeps the angle and fits the robot, cell objects and any visible target ghost (not the floor or planes). Plan mode keeps looking straight down while a drag pans the view.
F/T sensor
On a robot with an F/T sensor, a chip at the bottom left of the 3D view shows F/T ✓ with the force and torque magnitudes when the sensor is OK, and the status sentence otherwise. Before zeroing, or after the pose changes, the gripper's weight shows as force. That is normal.
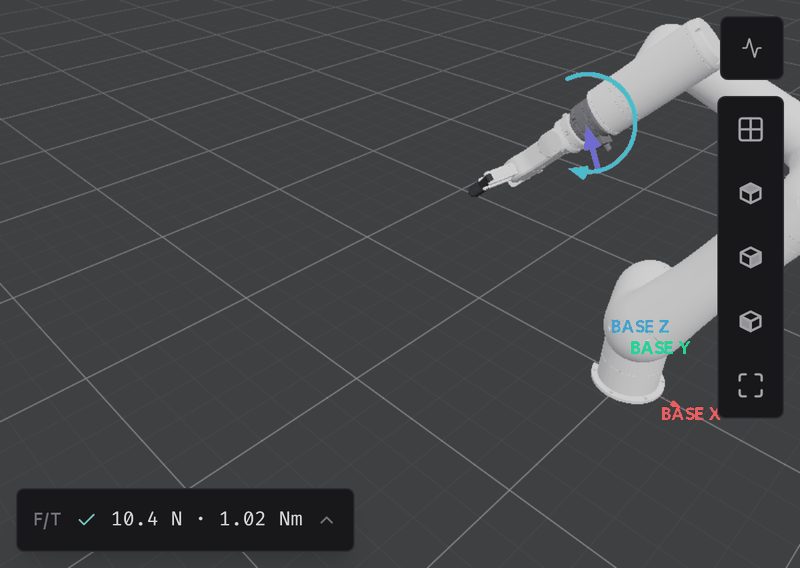
Tap the chip to open the card: status, load against the rating, force and torque bars per axis, a button for the 3D force arrows, Zero and Measure Payload.
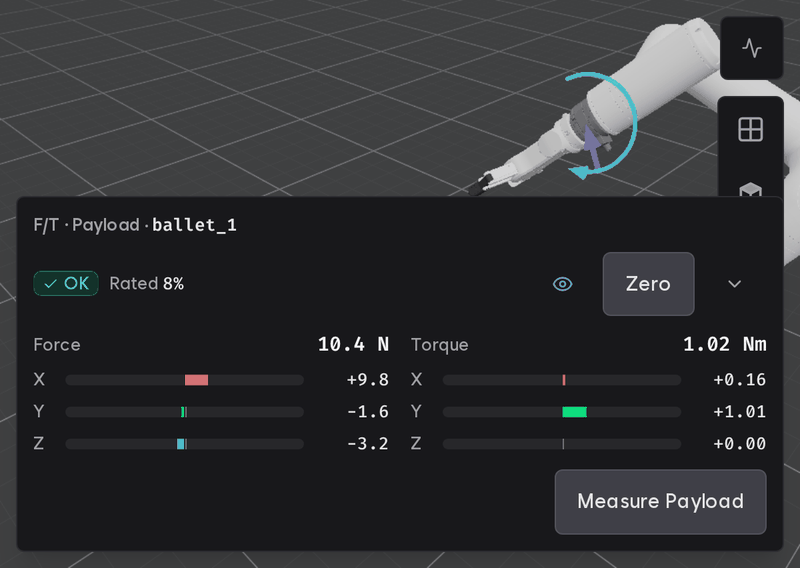
To zero, make sure nothing touches the tool, put the robot in the pose where you will read values, press Zero, then Zero now.
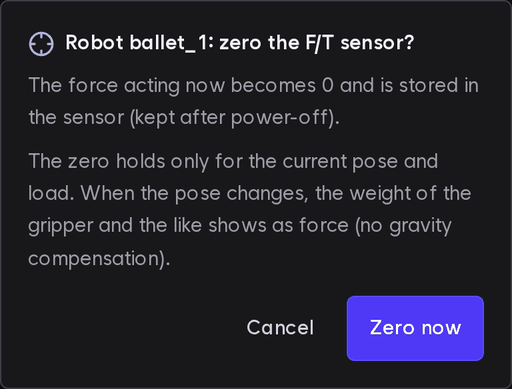
When the bars come back near 0 it is done. If it fails, the values and the reason appear; keep the tool still and press again.
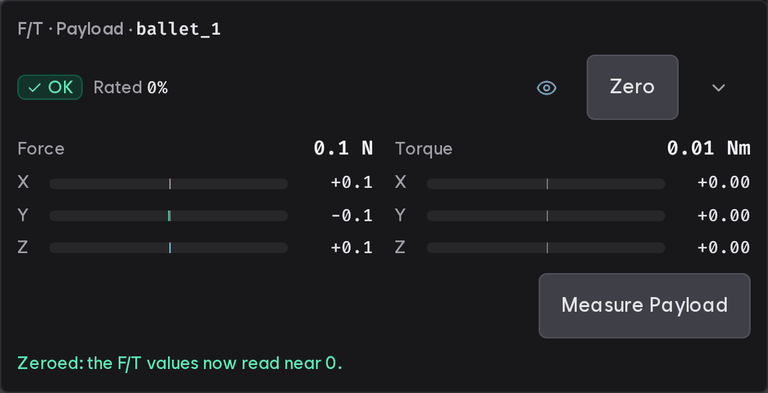
The Pendant locks Zero while the robot is disconnected, no F/T values arrive, the sensor reports an error, a Job runs, or Jog is on. How the robot checks a zero and when it refuses one are in F/T sensor; measuring the payload is in Removing the payload.
Cell objects
Objects in the cell pane lists the cell's objects. They are stored on the server, so they stay the same after reopening or on another tablet. Objects may overlap.
- Press Add object and pick a shape: Plane · Box · Sphere · Cylinder · Cone, or Mesh file (STL · OBJ · GLB · DAE).
- Pick how to place it.
- Place in 3D: it lands in front of the robot (X 500 mm) on the floor or on the top face of an object there, is saved, and gets the move handle. A plane goes in as a wall 1 m in front, facing the robot.
- Enter values: name, size, position (X · Y · Z mm, world) and orientation (Rx · Ry · Rz °), then Add.
- Touch points with the robot (box and plane only): touch the TCP to the real object and press Take point. For a box, take a top corner, a neighbouring corner sharing an edge (this edge sets the box's direction), then the diagonally opposite corner, and enter the height. For a plane, take three points not on one line. Add works once the TCP is 20 mm or more off the object.
- Pick the purpose. With Collision checking, plans reject paths that hit the object (they do not route around it), and Jog slows down and stops as it nears it. Display only shows it. A save reaches collision checking at once, without a restart.
Add as pedestal puts a box or mesh under a robot base; a box's height follows the mounting height. Import and Export exchange MoveIt .scene files.
Tap an object in the list or the 3D view to select it in both, and edit its values in the properties below. A size that is not a number or not above 0 shows the reason under the field and is not saved. If another screen changed it first, the latest values reload; enter yours again.
While Objects is open, edit tools appear in the 3D view as icon buttons; hover for their names.
| Tool | What it does |
|---|---|
| Select · Move · Rotate · Size (top left) | Puts one handle on the selected object: none, arrows, rings, or boxes at the axis ends. Size always works on the object's own axes from its centre (minimum 1 mm); planes and meshes have no size handle, and a pedestal box changes only width and depth. Releasing a handle saves, and one drag is one undo step. Overlapping another object marks both in red but still saves; overlapping the robot snaps back |
| World axes · Object axes | Handle axes along world X · Y · Z or along the object's own axes |
| Attach to faces | On by default. While moving, a face within 20 mm of another object's, the floor's or a plane's face snaps against it or lines up with it, and lets go after 30 mm. On release, an object that is not resting on anything is set down on the floor or the object below it. Round shapes count as their bounding box, so a sphere, cylinder or cone can settle onto a neighbour a few cm away |
| Snap | Move in 10 mm steps, turn in 15° steps, resize in 10 mm steps |
| Multi-select | Taps in 3D or the list add or remove objects. With two or more picked, the handles hide, the properties edit the last one, Add object is off, and the lower tool row turns into the align tools |
| Align tools (multi-select) | Align the picked objects on a world axis to the Align reference's min face, centre or max face. Spacing evenly needs three or more and keeps the two end objects. Pedestals, planes and meshes without a size are left out with the reason. One align is one save and one undo step; if any object would touch the robot, nothing moves and the contact is named |
| Frame the selected object · Duplicate (bottom) | Frames the camera on the object. Duplicate makes the same shape, size and purpose next to it (along Y, or 100 mm along a plane's normal) |
| Undo · Redo | Steps through changes saved from this Pendant. Loading another screen's changes clears the history |
| Delete | Deletes the selected object; Undo brings it back |
The Floor at the top of the list (a plane at world height 0) is off at first; in a cell made before 0.11.0 it keeps its old name, 바닥. Check the mounting height, then turn it on: plans reject paths through it and Jog stops before it. The boundary that trips a Protective Stop is the Protective Stop height.
Not yet applied to the robot planner below the list means the planner has not taken the current objects yet; if the stack is off, the server applies them when it comes up, and a refusal is logged on the server. With the server disconnected, the tools dim and The server is disconnected, so cell objects cannot be changed shows.
Collision checking against cell objects is verified for point-to-point moves, hold-to-move and Jog. Other planners, such as collision-avoiding motion (cuMotion), are not guaranteed to respect them (Launching the stack), and trajectories you send yourself are not checked (ROS 2 interfaces).
Canvas
The canvas shows one document at a time. There is no mode button; what you open decides it.
| Document | How to open it | Editing |
|---|---|---|
| Program | Tap its row in the list | Yes |
| Job | Tap its row, or automatically right after ▶ | No. While it runs, progress is drawn (Run) |
A finished Job keeps its last node colors only if you watched it finish on this screen. Opened later, all its nodes show the waiting color.
While a Job is open, a Job band with a lock (read-only) and a one-line state takes the place of the edit command band. When it is not running and its program still exists, Edit (pencil) opens the program with the same node selected: the one you tapped, or else the one the server pointed at for a Protective Stop or the end. The view position and zoom carry over, at no less than 100%. If the program no longer has that node, That node is not in the original shows. It opens the program as saved now, which can differ from when the Job was made. If the run channel drops, the band turns grey and dashed and shows Last received.
While a Job is running, in a Protective Stop or waiting for recovery, you cannot go back to a program: the list rows and New program lock, with the reason above them.
Notices
| Notice | Meaning |
|---|---|
| Catalog not connected | The node list did not arrive from the server. Press Retry |
| ROS connection failed | The server did not give the robot name, or did not answer. Check the server, then press Retry. The screen still opens, but the 3D view, Jog, ▶, mode change and Waypoint save and update lock with Checking the robot connection |
| Not saved in the header | Edits did not reach the server. Press Retry if it is there; otherwise read the reason beside it |
Shortcuts
| Key | Action |
|---|---|
Ctrl+Z · Ctrl+Y (or Ctrl+Shift+Z) | Undo · redo |
Ctrl+A | Select all nodes |
Ctrl+C · Ctrl+V | Copy · paste the selected nodes, with the links between them |
Ctrl+G | Wrap the selected nodes in a loop |
Enter | Open node details for the selected node |
Delete · Backspace | Delete the selected link if there is one, otherwise the selected nodes |
Esc | Close menus and popups. Works while running too |
Ctrl+B | Open or close the left panel |
- While the cursor is in a text field, the keys type there instead.
- While a Job is open, keys that change the canvas (undo, paste, delete, wrap) do nothing.
EscandEnter(read-only node details) still work. - None of these shortcuts moves the robot. A focused Jog hold-to-move button does respond to Space or Enter held down, the same as holding it.
Help at the bottom of the rail opens the same keys, the editing commands with where to find them on touch, the robot modes and recovery.