Moving the robot
There are three ways to bring the robot to a working pose:
- Guide it by hand in Freedrive
- Move it in small steps with Jog
- Move it to a saved Waypoint
Robot modes
The three icon buttons in the robot control bar at the bottom set the robot mode. They show no text; hover to see the name.
| Icon | Button | Mode | What it means |
|---|---|---|---|
| Padlock | BRAKED | Brakes on | No power to the motors. The robot starts in this mode |
| Curve | TRAJ | Trajectory | The robot follows commands. Jog and program runs work only in this mode |
| Hand | FREE | Freedrive | You move the arm by hand. Asks for confirmation first |
Which buttons you can press:
The P-STOP recovery steps are in Run.
- If the robot is in an error state, an
ERRORbadge and a Reset button replace the mode buttons. Each press sends a new error reset. STOPPING...shows while the robot slows down before it changes mode. Wait for it to finish.- If the error badge is gone but the robot does not move, check that it is back in BRAKED, then pick the mode you want again.
Look over the work area again right before every mode change. Switching to TRAJ powers the motors, and the robot can move at once.
In Freedrive, keep one hand near the Emergency Stop. Be ready to hold the arm, and never put a hand between the arm and a fixed structure.
When Freedrive feels heavy
Freedrive does not hold a position. It cancels the weight of the arm and of the devices set for this robot, such as the gripper and the camera on the tool. Joint friction is not cancelled, so some resistance is normal.
If the arm feels heavier than usual or sinks when you let go, it is carrying weight the robot does not know about, such as a part in the gripper or a tool that is not set for this robot.
- Hold the arm and switch to BRAKED.
- Take the part out of the gripper, or set the mounted devices correctly in Settings.
- Switch to FREE again.
Stop
The red Stop icon button at the right end of the robot control bar stops every robot in the cell, not only the one you are working with. It runs these steps without waiting on any of them:
- The server tells running programs and calibration drives to stop, and asks Jog to turn off.
- On every robot, it asks to cancel every trajectory, calibration and gripper motion, including ones sent by other screens and tools.
- It asks every robot for BRAKED at once. This is the same as pressing the padlock button, and it cuts off any mode change in progress.
The screen then reports success only when every robot is confirmed in BRAKED. If any robot is not confirmed, it reports failure with one line per robot.
- A moving arm gets the brakes right after the cancel, with no slow-down phase. The stopping distance has not been measured.
- Stop works even when other controls are locked, for example during a program run or a calibration drive.
- When the server is disconnected the button is dimmed. Pressing it only shows that the stop cannot be sent.
- If BRAKED is not confirmed or the server does not answer, an error stays until you close it. If the robot moves, press the E-Stop button.
- A gripper that was moving gets a stop command. Depending on the gripper model it may keep holding its part with little force, or let it go. Check any part it was holding.
Until the stop finishes, the server refuses new moves, gripper commands and program starts. Until BRAKED lands, Jog pressed again and tools that bypass this server (plem code, Lab, the TUI) can still move the robot. See Stops and safety.
Stop is a screen button and cannot replace an Emergency Stop. In danger, press the physical Emergency Stop (E-Stop) button. A screen that has lost the server cannot send a stop.
Jog
Use the Jog panel next to the 3D view to move the robot in small steps. It shows only in setups with Jog enabled. Where it sits depends on the screen layout (Screen layout).
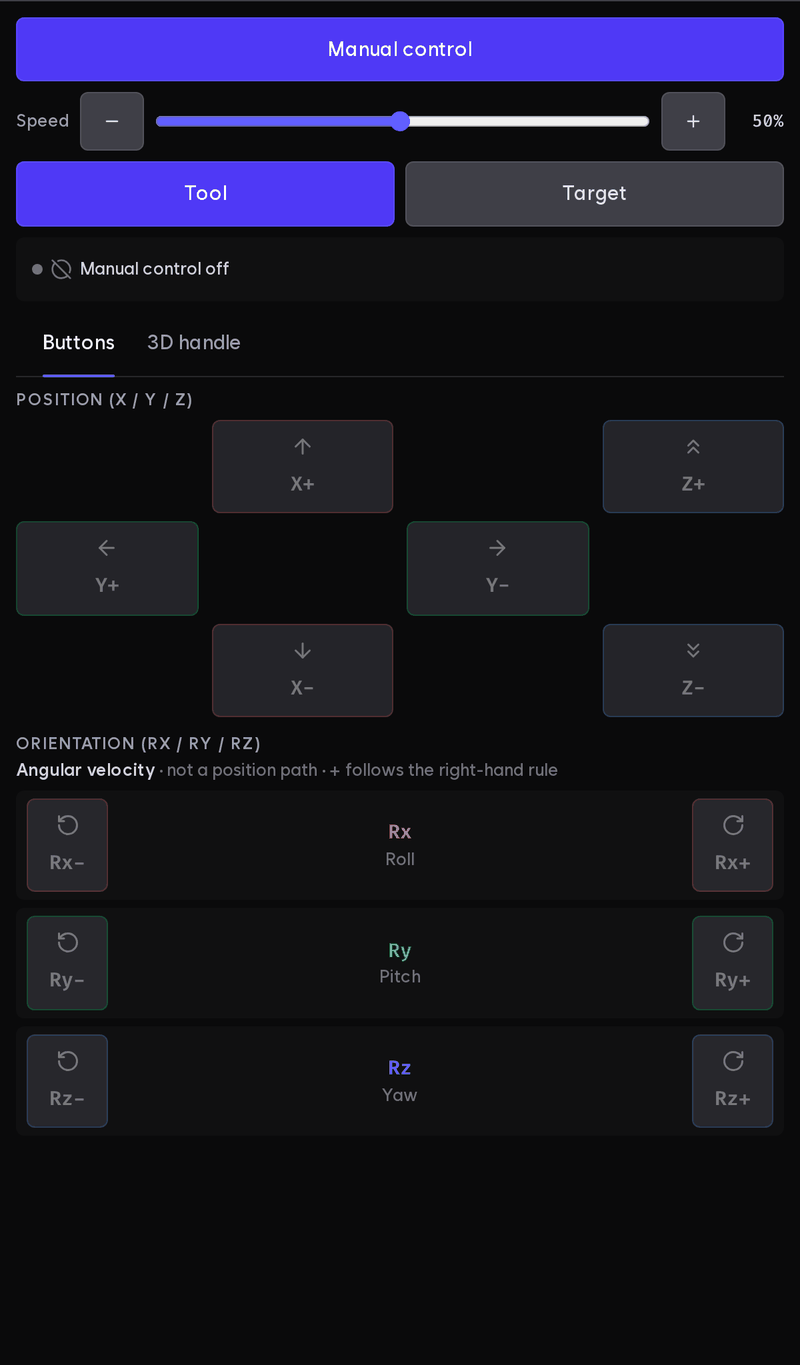
- Press Manual control. If the robot is in BRAKED or FREE, it asks whether to switch to TRAJECTORY.
- Set the speed.
−and+change it by 1 %, and the slider goes from 1 % to 100 %. 100 % is the Jog engine's top speed: 250 mm/s at the TCP and 1 rad/s in rotation, within the joint limits. - The robot moves only while you hold a direction button. Let go to stop.
- When you finish, press Turn off manual control (the same button).
| Tab | How it moves |
|---|---|
| Tool | Buttons: Position (X / Y / Z) pushes the tool tip along an axis, Orientation (Rx / Ry / Rz) turns it about an axis, in the tool frame. 3D handle: drag the cube at the TCP to move, or turn a ring around it to rotate (see below) |
| Target | One planned move to a target pose while you hold Hold to move (below) |
With the 3D handle the robot follows the cube. When you let go, it goes on by itself to where you left the cube and stops. The cube stays within 0.25 m and 0.6 rad of the TCP. If the robot stops getting closer for 1 s, the move ends. Grabbing the cube again or leaving the window also ends it. Hold Shift while you grab to move at 1/10.
There is no Jog that turns one joint at a time. To set joint angles, use Target › Joint.
The status line under the tabs shows what the Jog engine decided. Yellow means it slowed or blocked the motion, and red means it stopped. After a stop, press the button again (or grab the handle again) to start over.
| Status line | What it means and what to do |
|---|---|
Manual control off · Jog ready | Before manual control · Press to move |
Near a collision: slowing down | Close to a cell object or another body. Move away from it |
Near a singularity: slowing down, try another direction | Move along another axis |
Near a joint limit: slowing down | A joint is close to its limit |
Cannot move further in this direction | A limit or an obstacle is in the way. Move in another direction |
Stopped: <reason> | The engine stopped, for example because the robot state arrived late or no safe motion was found. Check the reason and press again |
Do not use another input device (a tracker or an external program) during manual control. The robot cannot tell input sources apart.
When Jog cannot start
The reason is shown. Jog cannot start when:
- The robot or the server is not connected
- The server is cleaning up the previous control session
- The robot is in Protective Stop
- A Job is running
- The cell screen is hidden (you are looking at the Program tab only)
- A calibration drive is moving the robot (until it ends or you cancel it)
If one of the above happens while manual control is on, or you switch the robot out of TRAJ in the bottom bar, manual control stops on its own. "Manual control ended: reason" stays until the next start or until you turn it off.
If the robot does not confirm the release, "Session release not confirmed" shows too. If you are on the Program tab, the cell tab gets an orange dot. Open the cell and press Turn off manual control. The button stays on until the release is confirmed.
If you close the browser tab and no Pendant is left on the server, the server tries once to release the control session on the robot. If that fails, the next Pendant can still turn Manual control on, and turning it off cleans up.
Moving to a joint target
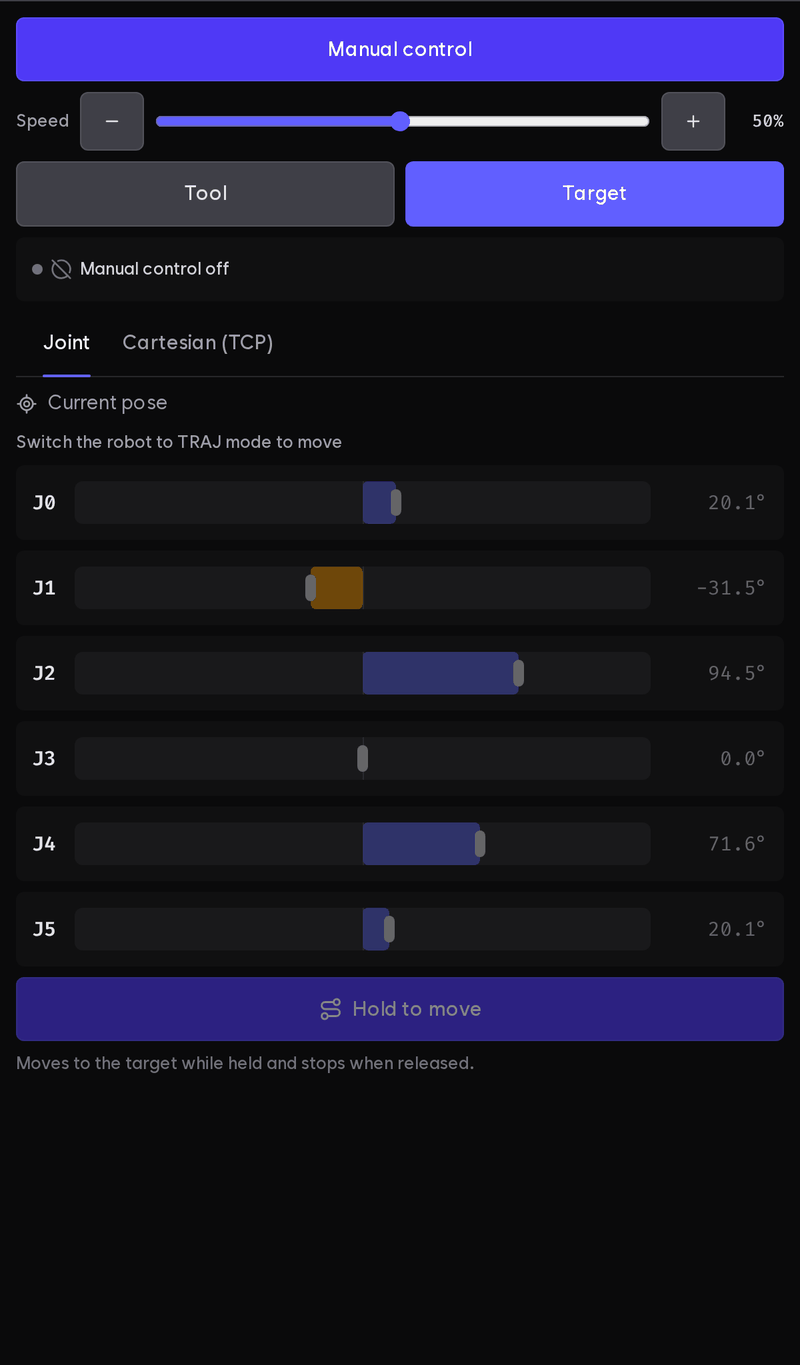
The Target tab is one move, not Jog. Pick Joint to set the target as joint angles, or Cartesian (TCP) to set the tool tip position and orientation (Cartesian target).
Setting the target
Set each joint with its slider (arrow keys 1°, Shift 10°) or tap the value and type it. The range is the joint limit from the robot model (URDF). Until the limits are read the tab is locked, and a missing or broken limit is named, for example URDF joint limit missing or invalid (J3 joint_3).
At first the target follows the robot's current pose (the "Current pose" line at the top). Where it comes from after that, and what happens when a move ends:
| Target from | When the move reaches it or fails | When the move is cancelled (you let go) |
|---|---|---|
| A slider or a typed value | Goes back to following the current pose | Stays. Press again to carry on to it |
| A point picked in the Waypoints section | Goes back to following the current pose | The point stays the target |
- When you set a value, the line changes to "Typed joint values" and Use current pose appears. Press it to follow the current pose again.
- A picked point shows its name above the sliders. The move goes to the pose the server holds for that point at the moment you press. A rename or an update made elsewhere is followed.
- The point stops being the target when you tap it again, delete it, switch to Cartesian (TCP), or change a joint value.
- The target does not change during a move. Changes made to the point during a move apply after it ends.
- The speed is the Jog speed.
The target shows in the 3D view as a see-through robot (the target ghost), with "Joint target · Preview" at the top left. While you hold the button the chip reads "Moving", and when the target is reached the ghost lines up with the robot.
- While you type a value the move button is locked. Press Enter to confirm. The move always goes to the values on screen.
- A value outside the range is refused on Enter, and the old value stays.
- If the pose read from the robot is outside a joint limit (for example a joint resting on its limit, rounded by 0.1°), that value shows in orange. It is sent as is, and planning may refuse it. The slider and arrow keys do not change that joint. Tap the value and type an angle within range.
Moving and stopping
While you hold Hold to move, the robot plans a collision-checked path and moves to the target. When you let go, it asks to cancel that move only.
- On release the robot slows down along the path and stops. "Stopping…" shows under the button until it stops, then "Cancelled". If it cannot slow down smoothly, it stops by holding its position with no slow-down phase. If the slow-down cannot be confirmed, it goes to BRAKED.
- The same cancel goes out without your letting go when you switch tabs, hide the cell screen or turn manual control on, when the Pendant window loses focus or is hidden, and when the Pendant connection drops (the server cancels for it). These cancels stop by holding the position with no slow-down phase. The move does not restart when things go back to normal.
- A move that has already finished is not touched.
- To also apply the brakes, use Stop. In danger, use the Emergency Stop.
Result
The result stays as one line under the button. Where it says "server reply", the text comes from the server as is.
| Result | What it means |
|---|---|
Reached | The robot reached the target |
Reached — the stop came too late (Details: <server reply>) | You let go, but the cancel was late or refused, and the robot reached the target |
Cancelled (Details: <server reply>) | The move was cancelled. The reply says whether it was before moving or partway |
Did not move: <reason> · Failed (Details: <server reply>) | The server refused, or planning or execution failed. A path collision shows as Failed: <object and point hit> |
Did not move: another motion is using the robot (…). Press again once it finishes | A running Job, a calibration drive or Jog holds the robot |
Stopped: the robot switched to BRAKED | The robot went to BRAKED while slowing down after you let go, for example from Stop |
Stop not confirmed: <reason> | The robot did not answer. The server refuses other moves until that move is confirmed over. Check the robot |
The button is locked, with the reason shown, while the robot is not in TRAJ or manual control is on. Only one source can move the robot at a time, so turn manual control off first. The reasons Jog cannot start apply here too.
To use the reached pose in a program, save it with Save current position in the Waypoints section and pick that Waypoint in a move node. Move nodes do not hold joint angles.
Moving to a Cartesian target
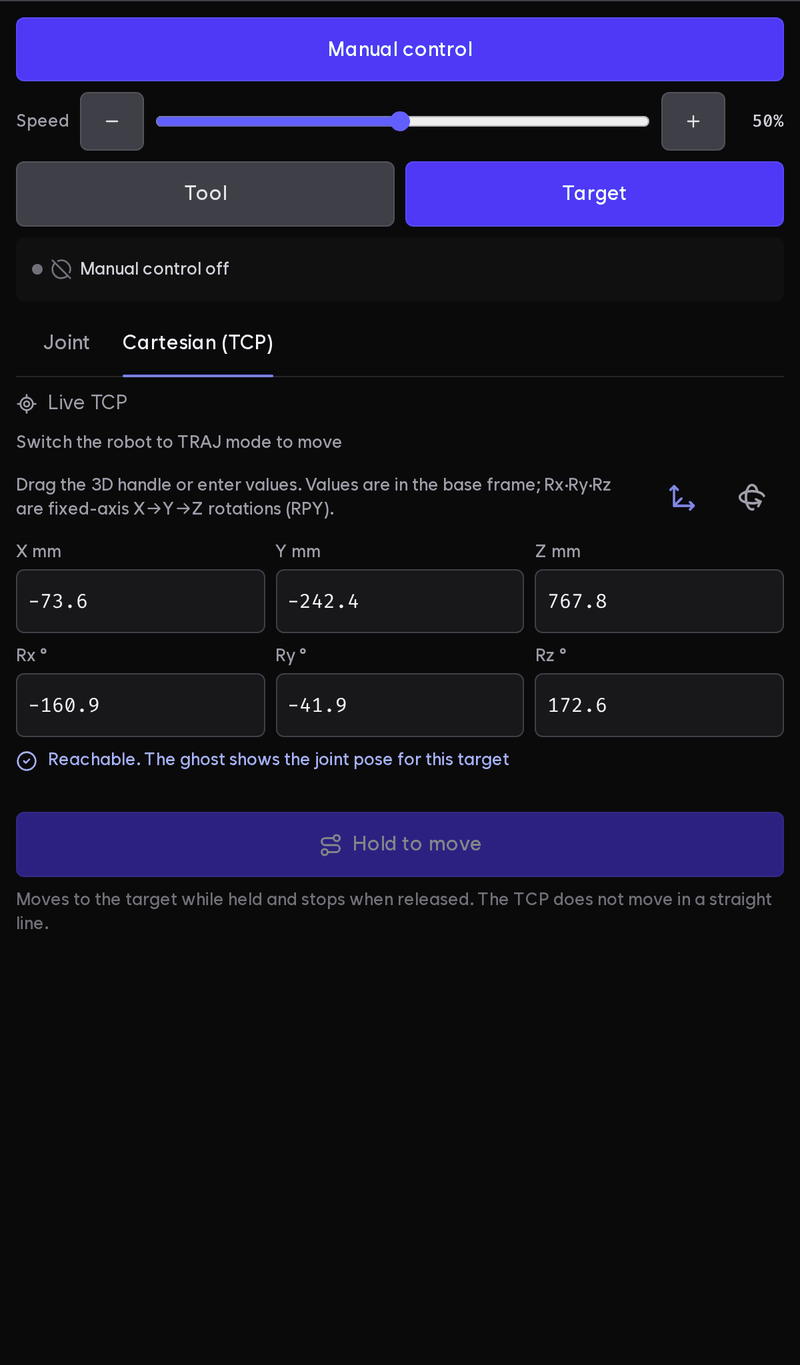
Cartesian (TCP) works like the joint target, with these differences:
- You set the tool tip position and orientation: drag the handle in the 3D view, or type X, Y, Z (mm) and Rx, Ry, Rz (°) and press Enter. Values are in the robot base frame. Rx, Ry and Rz are fixed-axis rotations in X → Y → Z order (RPY).
- One handle shows at a time. Switch with Move handle and Rotate handle next to the fields, so a gloved hand does not grab the wrong one. The handle arrows and rings follow the tool axes of the target pose, so dragging along one of them can change several base-frame fields at once. The handle hides during a move.
- The server solves the joint values for the target, and the ghost follows that joint pose. While you drag, it solves each time your hand pauses. The move button is locked while you type or while the solve runs.
- The move is a joint-space move to the ghost's joint pose, so the TCP does not move in a straight line. The screen says so too.
The result line and the chip at the top left of the 3D view show the ghost state in color, icon and text.
| State | What it means |
|---|---|
Reachable | The ghost is the joint pose for this target |
Unreachable | No collision-free joint solution was found, or the solution misses the target. The server's reason shows in the result line and Hold to move locks. The ghost stays red at the last solved pose |
Near a singularity | Manipulability at that joint pose is below the threshold. This heuristic checks only the end pose and does not guarantee the path avoids singularities. It does not block the move. Tool Jog may slow down or stop at that pose |
Moving | You are holding the button and the robot is moving to the target |
Waypoints
A Waypoint is a joint pose saved under a name. Move nodes in a program point at a Waypoint as their target. You manage Waypoints in one place: the Waypoints section of the cell tab, opened from the section bar on the left.
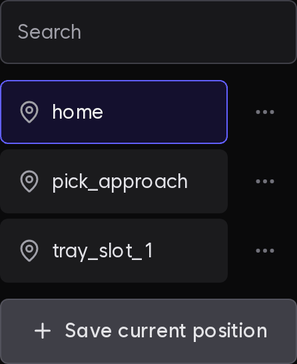
Each row shows only the name. Tap a row to show that pose as the target ghost and make it the Jog target (joint target). Type part of a name in the search field to narrow the list.
Saving
- Bring the robot to the pose you want with Jog or Freedrive.
- Press Save current position under the list. The current pose is saved at once under a short name, P1, P2 and so on: one past the highest P number in use.
- The new row opens for renaming with the name selected. Type a new name and press Enter, or press Esc to keep it. A name already in use is not taken, and the reason shows under the field.
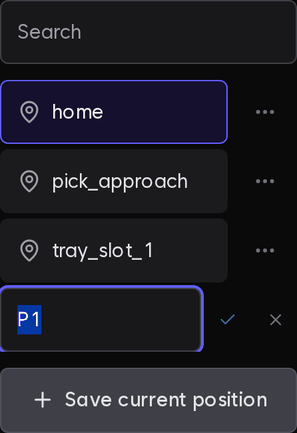
With no server connection, the reason shows at the top of the section and saving, updating, renaming and deleting are locked. While the robot is being checked, only saving and updating are locked, with the reason in the same place.
Saving from the bottom bar
Save position, just left of Stop in the robot control bar, saves the current pose at once with no dialog. The name is given the same way (P1, P2 …), a toast shows it, and the row appears in the list. Rename it later with ⋯ › Rename.

It is locked with no server connection or while the robot is being checked. It is not locked during a Protective Stop, because it only reads the pose. When the bar is full the button may hide; see Screen layout.
The row ⋯ menu
| Menu item | What it does |
|---|---|
| Update to current position | Replaces the saved value with the current pose. The old value cannot be restored, so it asks first. It applies to every node that uses this point |
| Rename | Edit the name in the row. Enter saves, Esc cancels |
| Delete | First checks where the Waypoint is used. If nothing uses it, confirm once more in the menu to delete it. If something does, it is not deleted (below) |
The list has no button that moves the robot to a Waypoint. Pick the row, then hold Hold to move in Jog (joint target).
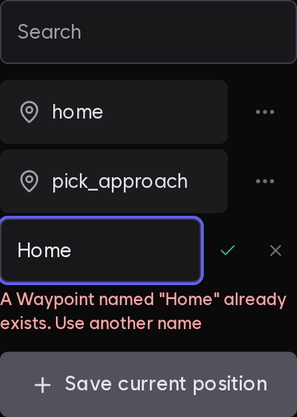
A name already in use (ignoring case) or a name starting with @ is refused, and the reason shows under the field. Nodes that use the Waypoint keep working after a rename, and saved programs and Jobs show the new name. Nodes remember the Waypoint by an ID, not by its name (Building a program).
If you delete a Waypoint that a saved program or Job uses, the row shows which ones use it and what to do:
- In the listed programs, pick another Waypoint in the move nodes that use this one.
- Delete the listed Jobs.
- Delete again.
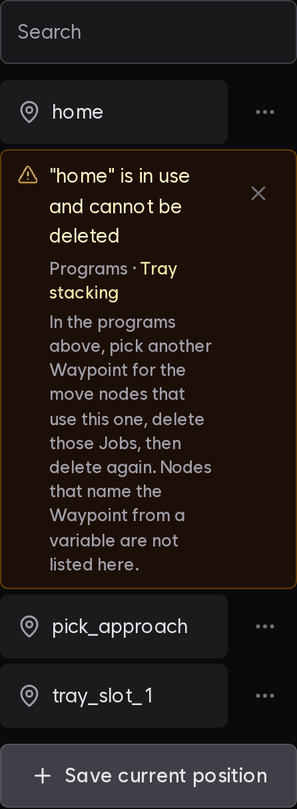
A node that takes the Waypoint name from a variable does not show up in the usage check. If you have such nodes, look at them yourself before you delete.