Start session
This is the first screen plem shows. The stack launches with the values you pick here. The cell is chosen in the top row, and below it are three panes.
- CELL (top): the cell to launch. A cell is one workcell: its robots and where each one stands.
- ROBOTS (left): the robots in that cell. They all launch together. Registered robots that are not in the cell are listed dimmed under NOT IN THIS CELL.
- SESSION (middle): EtherCAT masters, control period and components.
- PREFLIGHT (right): the cell name and the items Start checks.
- Pick the cell in CELL at the top.
- Check the EtherCAT master and control period in the middle.
- Turn components on or off.
- Check that the cell name at the top of PREFLIGHT matches the real workcell. When every PREFLIGHT item passes, press Start session or
s. - On the Robot Control screen that opens, press
sonce more. Only then does the stack launch.
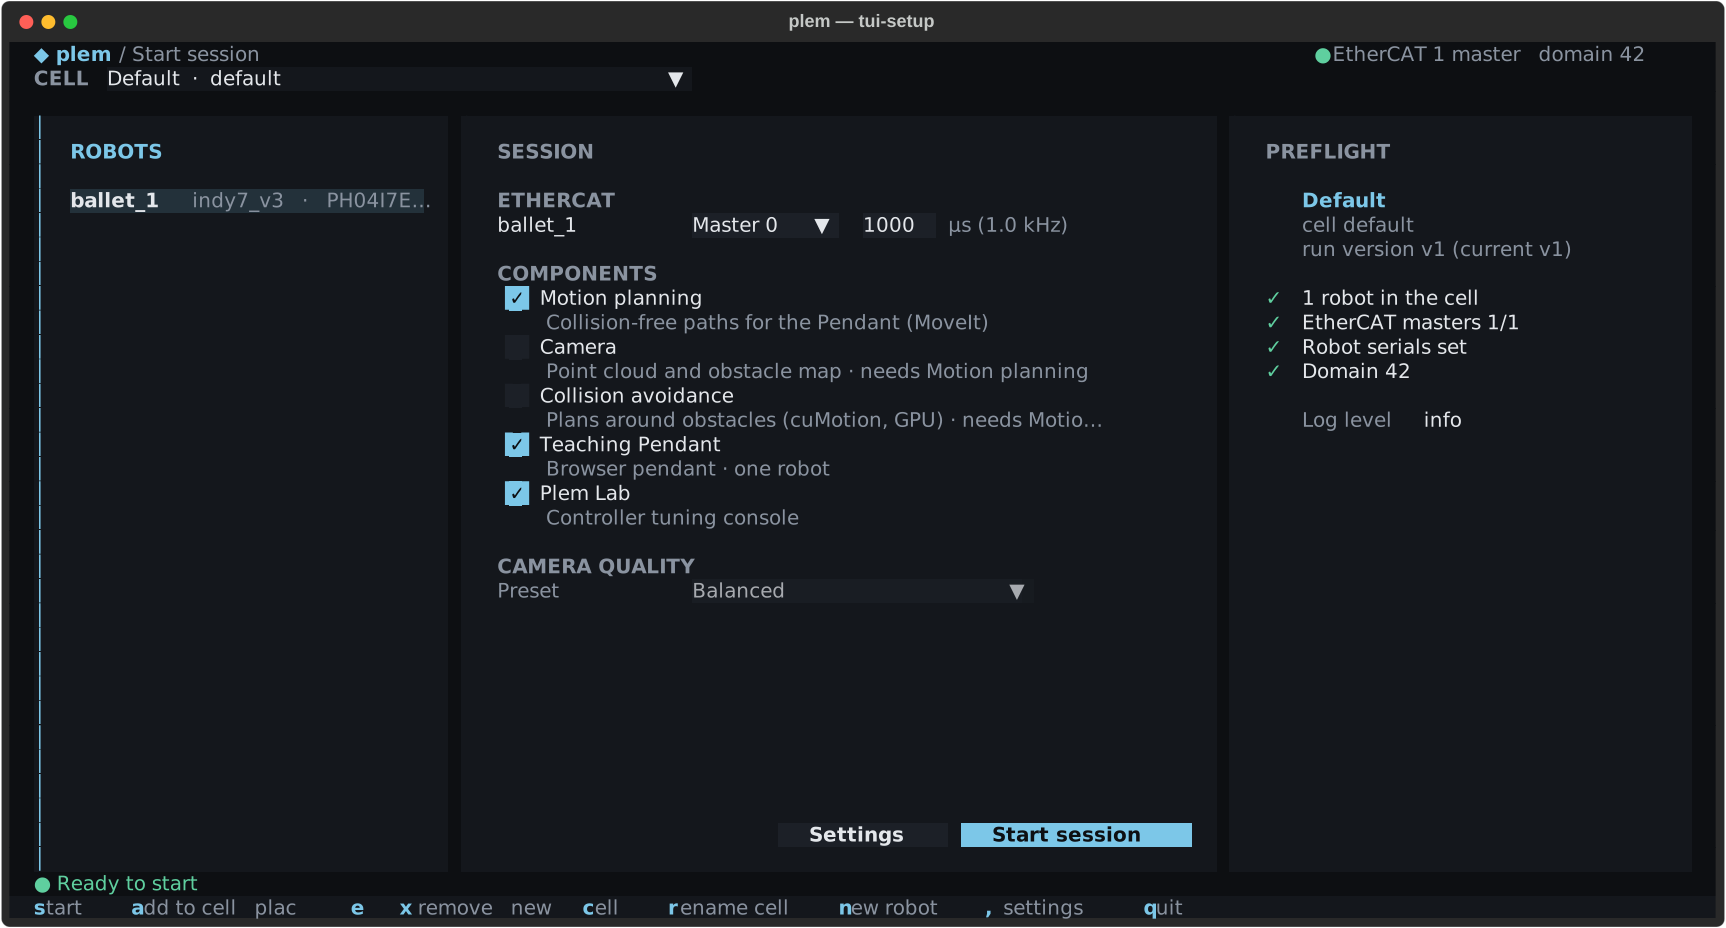
The bottom two lines are the state line and the key bar. The state line says in one sentence what is true now. In the key bar, the letter to press is coloured inside each label. With the Korean input method on, the key in the same position works too: ㄴ for s, ㅂ for q.
| Key | What it does |
|---|---|
s | Start |
a | Add a robot to the cell |
enter | Add the robot under the cursor in NOT IN THIS CELL |
e | Edit the position and protective floor of the robot under the cursor |
x | Remove the robot under the cursor from the cell |
c · r · delete | Create · rename · delete a cell |
n | Register a robot |
tab | Next pane |
, | Open Settings |
q | Quit the program |
The key bar shows only the keys the visible cell can use. An empty cell leaves out s, e and x, and the Default cell leaves out delete.
When the window is narrower than 130 columns, the PREFLIGHT pane folds away and its first warning moves to the state line. Below 100 columns the component descriptions are hidden too.
Header line and ROS domain
The right end of the header line shows how many EtherCAT masters were detected and the ROS domain of this run. With no master it shows a red ✖ no EtherCAT master. With domain 0 (unset) it shows a red domain 0.
The domain is the one value saved in Settings. Shell environment variables are not read.
PREFLIGHT has a domain row too.
| Row | Meaning |
|---|---|
✓ Domain N | The value applied to this run |
! Domain M saved · restart plem to apply | You changed it in Settings but have not restarted plem yet. Quit plem and run it again |
! Domain 0 is shared | No domain is set. Traffic can mix with any other ROS 2 participant on domain 0 within the same DDS transport scope |
The default DDS setup stays on the device (localhost). If you connect an outside ROS 2 environment, set a domain from 1 to 101 in Settings first. Matching it to your own ROS 2 environment is covered in ROS 2 interfaces.
Cells
A cell is one workcell. It holds its robots and, for each robot, its position in that workcell (X, Y, height, direction) and the protective floor height. The same robot can sit in several cells, so each line can have its own position. After an update from a version without cells there is one Default cell holding the robots you launched last. If a robot did not fit, a notice says so when the screen opens.
- Pick a cell: click CELL at the top, or move there with
shift+taband choose with Enter. ROBOTS switches to that cell's robots. Start launches every robot in the cell, so to launch one robot alone, make a cell that holds only it. - New cell (
c): enter a cell ID and a display name. The cell ID takes letters, digits and_and never changes. Rename the display name withr. - Delete cell (
delete): lists the files saved in the cell folder (cell objects, cell IO and so on) and asks for confirmation.yconfirms; Enter does not. Robot profiles are kept. The Default cell and a running cell cannot be deleted, and the state line says why. - Add or remove a robot (
a·x):alets you pick a registered robot that is not in this cell. Enter on a robot in NOT IN THIS CELL does the same. A new robot starts at the origin with the protective floor off. A cell holds up to 4 robots.xremoves the robot under the cursor. Its position in that cell is deleted and its profile stays. - Edit position (
e): change X, Y, height (mm), direction (°) and protective floor (mm) of the robot under the cursor. A blank protective floor turns it off. A floor above the mounting height is not saved and the reason is shown. Saved values apply from the next launch. The numbers appear only in this dialog; the TUI does not draw the layout.
Picking another cell switches the protective floor height and the cell-object collision checks to that cell's values. Check the cell name at the top of PREFLIGHT before you launch.
run version vN (current vM) in PREFLIGHT is the cell version this launch will use. Each save of the cell adds one version. If the same cell is already running, a new launch joins the version that launch uses, so N can be lower than M. Values saved in between apply only after every launch of that cell is stopped and started again.
Each ROBOTS row reads <robot ID> <model> · <serial> · camera. The serial appears only when it differs from the ID, and camera only on robots with a camera set.
- With no robot registered, a hint replaces the list and
nregisters one. A robot registered here withngoes into the visible cell if it has room; if the cell is full, a notice says it was not added. Robots registered in Settings or Depot appear in NOT IN THIS CELL, so add them with Enter ora. If the list differs from your delivery, contact support. - An orange
no modelorinvalid modelin the model place means the robot model is empty, and that robot will not launch. Choose its Model in robot edit. - An orange
no robot profilemeans a robot deleted in Settings is still in the cell. Remove it withx.
Teaching Pendant and Plem Lab can be on whatever the number of robots in the cell. The Pendant shows every robot in the cell and operates the one picked in its top switcher.
EtherCAT masters
SESSION's ETHERCAT block has one row per robot in the cell. Each robot gets a free master automatically (Master 0). Picking a master another robot already uses swaps the two assignments.
When no master is detected, this message replaces the rows.
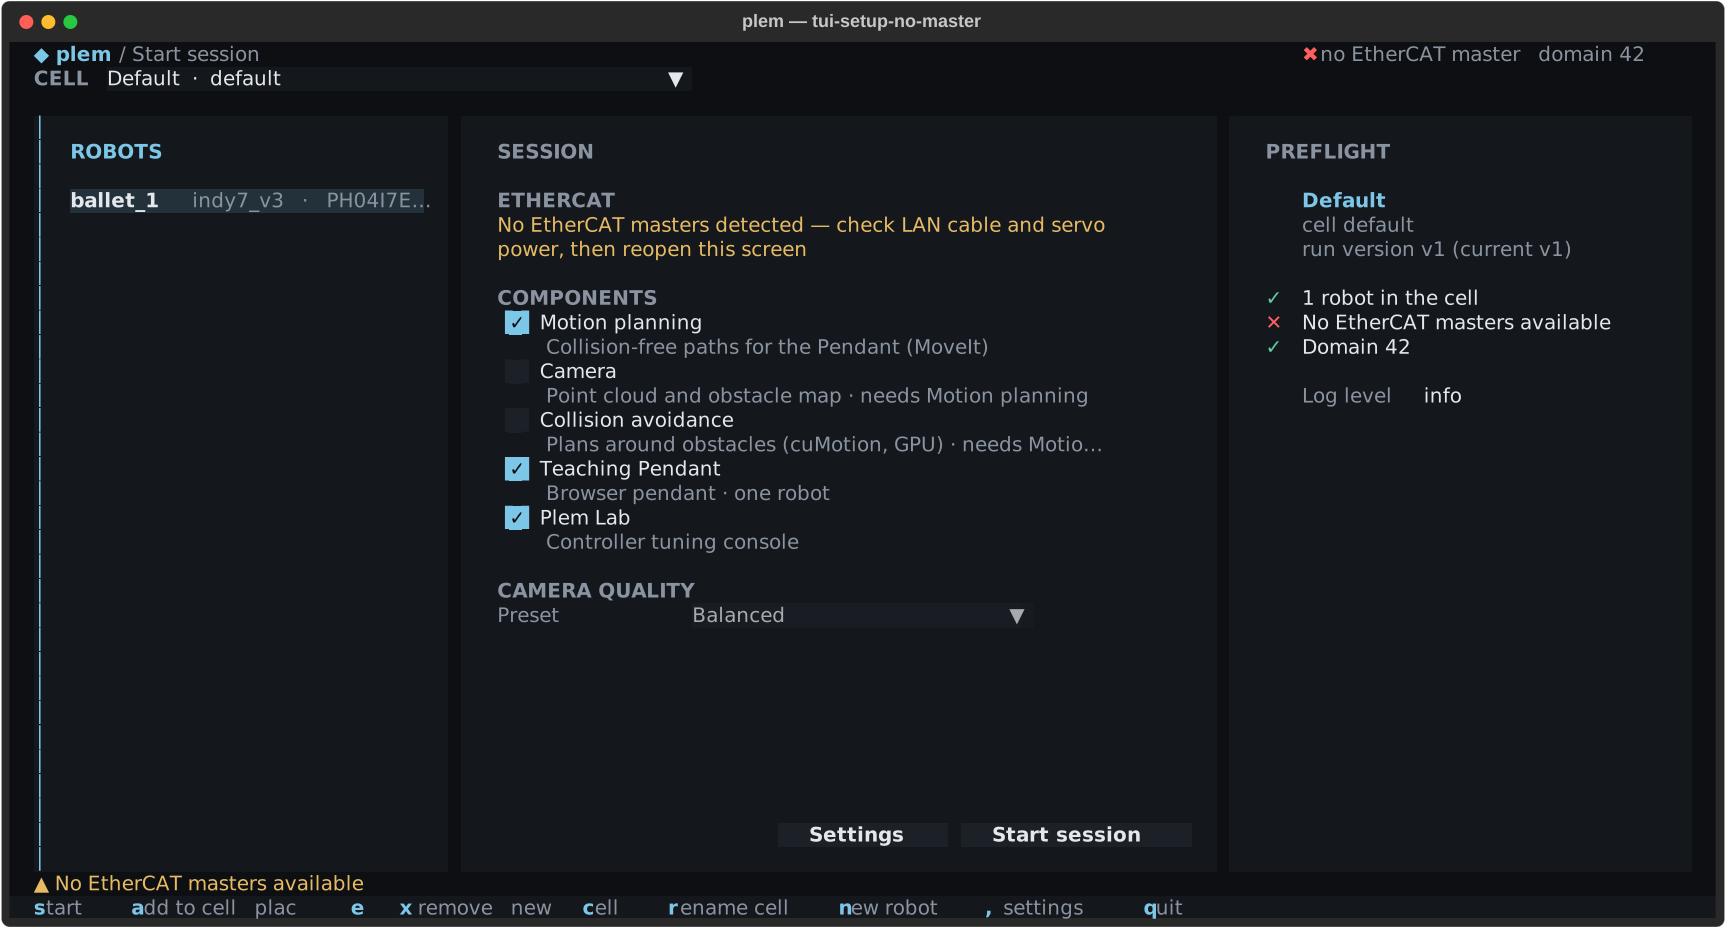
Check the LAN cable and servo power, then detect again: open and close Settings (,), or quit with q and run plem again.
Control period
The field next to the master is the control period.
- It is in microseconds and accepts 200–1000.
- The default 1000 µs is 1 kHz. The hint beside it follows the value, for example
µs (2.5 kHz). - It is not remembered. Every run starts at 1000.
Components
| Check | Default | Needs | When on |
|---|---|---|---|
| Motion planning | On | Nothing | Motion planning (MoveIt) starts. Joint moves and the Pendant's move nodes use it |
| Camera | Off | Motion planning, a robot with a perception camera set | The camera driver and 3D perception start. Heavy on Jetson CPU and GPU memory. Nothing starts on a robot without a perception camera |
| Collision avoidance | Off | Motion planning, a supported model | Obstacle-aware planning (cuMotion) starts. A model without support skips cuMotion and launches normally |
| Teaching Pendant | On | Nothing | The web Teaching Pendant starts |
| Plem Lab | On | Nothing | The web Plem Lab starts |
Which devices and models support Camera and Collision avoidance, and which setting fails the launch on a JetPack 7 device, is in Launching the stack and Supported hardware.
Turning Motion planning off also turns off and locks Camera and Collision avoidance. Turning it back on restores your earlier choice. If Collision avoidance is on while Camera is off, a notice at Start says there is no live environment map. Turn Camera on if you need one.
Preset under CAMERA QUALITY balances perception quality against speed: Fast, Balanced (default), Precise or Thin object precise. You can pick it only with Motion planning and Camera on.
The cell and component choices are remembered the moment Start is accepted and become the defaults of the next run. If that cell has been deleted, the Default cell opens. Master assignment and control period are not remembered.
Perception preview
With Motion planning and Camera both on, a line under Preset says how far and how finely that preset sees. Sees up to 3 m · 5 cm detail, for example, means obstacles are mapped out to 3 m in 5 cm cells. If either check is off, the preview is hidden.
- If the preset has no settings for the robot's camera,
⚠ this preset has no settings for … (it runs on camera defaults)is added. - Site values in
~/.are used in the preview too, and the overridden keys are listed on aplem/ perception_ overrides. yaml perception_line.overrides. yaml: … - If that file has a bad key or value, the reason appears as
⚠ perception_. Starting anyway is refused, so fix or delete the file. How to write it is in Site perception overrides.overrides. yaml rejected — the launch will refuse it: …
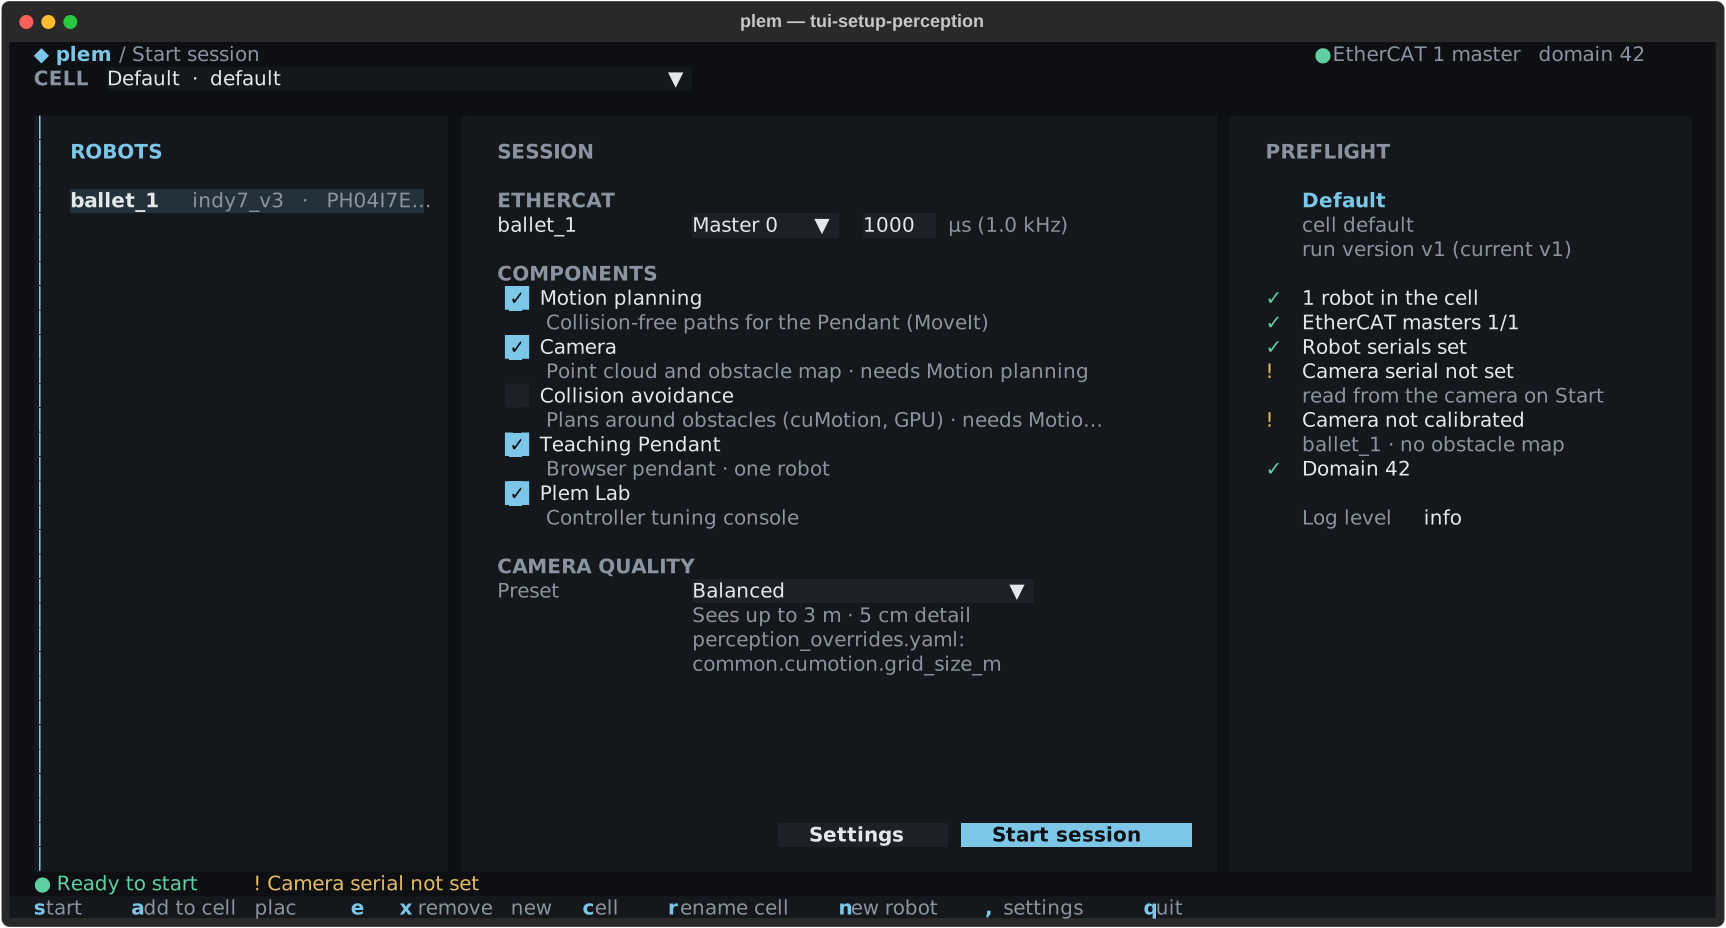
This example overrides the collision grid (common.) in ~/..
When Start is blocked
PREFLIGHT lists, in the order Start checks them, the items that pass (✓) and the reason it is blocked (red ✕). The state line repeats the reason after ▲. When everything is ready, Start session turns to the accent colour and the state line reads ● Ready to start.
| Message | What to do |
|---|---|
No robots in this cell | Add a robot with a, or pick another cell |
<robot>: no robot profile — remove it from the cell, or add it in Settings | A robot deleted in Settings is still in the cell. Remove it with x |
No EtherCAT masters available | Check the cable and servo power, then detect again |
N robots in the cell, only M EtherCAT master(s) — remove one (x) | Bring the robot count down to the master count. On a device with one master, make one cell per robot and switch in CELL |
Assign a master to <robot> · Duplicate master N | Give each robot its own master |
<robot>: serial not set — add it in Settings | Pick the serial on the robot's label from the Serial list in robot edit. If it is not listed, contact support |
<robot>: control period must be 200-1000 µs | Bring the control period into range |
Robot '<robot>' has no robot model … · … is not in any installed robot_ (on s in Robot Control) | Choose an installed model in the Model field of robot edit. If this robot's model is not listed, contact support |
The Serial list is built from the joint calibration profiles on this device (~/.). Joint offsets come from that profile (Launching the stack), so if the serial on the robot's label is missing, contact support instead of typing one in.
An orange ! in PREFLIGHT does not block Start on this screen, but you should know about it.
Camera serial not set: the profile has no camera serial. Start with the camera connected and it is filled in when exactly one camera is found. With none or several, Start says why. To set it yourself, enter the number on the camera label in Serial under CAMERA in robot edit.No robot model·Blank robot model: the launch will refuse it, so the state line shows▲instead of Ready. Choose the robot model in robot edit.Camera not calibrated: the camera starts but the obstacle map stays off. It turns on once you finish Hand-eye calibration.- Domain rows: see Header line and ROS domain.